Showing posts with label dream valley challenges. Show all posts

Tuesday, October 28, 2025

Autumn's Beauty

 
Hello and welcome.  Third post today, so I'd like to share with you a card made using images from Conjurer of Dreams.   All of the images were combined using Photoshop© so I could just print and add to an orange card.  With the way I've been hurting the last few days, the simpler is better right now.  I used the following COD sets:  Steampunk GnomeFall SilkWood Bark BackgroundPhoto CornersFall Gnomes (from a special set I won), Fall Background, and Creepy Scarecrow were freebies in the Conjurer of Dreams Inspiration Group.  I'm really happy with how this turned out.
 
Challenges entered: 
 
Make My Monday #263 - Halloween Colors (my choice-red, orange, brown, yellow)
 
Inspiration Station
 
Thanks for stopping by today.  Have a great day.
 
Stamps: Conjurer of Dreams
Ink: none
Card Stock: Neenah; Stampin Up
Accessories: Computer, Printer, Gold Cord, Bling, Glue, Pop Up Glue Dots, Brads 


Thanks for stopping by today.  Have a great day and don't forget to enter this month's challenges over at Conjurer of Dreams.
 
Stamps: Conjurer of Dreams
Card Stock: Neenah; Stampin Up; Scraps
Accessories: Computer, Printer 


Monday, July 28, 2025

PIP Challenge 2530


Sponsored by SheepSki Designs


Hello and welcome. Today begins a new challenge over at Pammie's Inky Pinkies and this week we're sponsored by Sheepski Designs.  I would like to thank Andrea for her sponsorship.  My card today uses the Mindy Christmas image and reminds me so much of my cats at Christmas time.  After printing the image on hammermill white card stock, I colored it using Copic markers before stamping a long retired Stampin Up saying.  A few clear gems finish the card off.  
 
Challenges entered:


Peace On Earth
 
 
Thanks for stopping by today.  Have a great day and don't forget to enter this week's challenge at Pammie's Inky Pinkies.
 
Stamps: Sheepski Designs; Stampin Up
Ink: None
Card Stock: Hammermill White
Accessories: Computer, Printer, Copic Markers, Bling 

Tuesday, July 15, 2025

Steampunk Sepia

 
Hello and welcome.  Today I'd like to share a card made using digital steampunk images from Conjurer of Dreams.   Now steampunk is normally "not my thing" but I do think I'm getting better at it.
 
I started out by combining the Steampunk SceneSteampunk Lady in SepiaAged PapersTea Dyed Papers and the Vintage Tags and Elements Craft Kit in Photoshop© before printing it out on Neenah white card stock, trimming down to size and then layering.  I then took the layered image panel and added it to a dry embossed saffron panel using an old Tim Holtz clock embossing folder and my Big Shot©.  After adding some faux brads, I dug out some ribbon I've had for years in my stash and added that before adding some bling to the butterfly, clock and main image.  The final touch was highlighting the background clock faces using a clear Sakura 3D glaze pen.  I'm pretty happy with how it turned out.
 
Challenges entered:
 
Never Before Used Schtuff #76 - Use Your NBUS (steampunk background, lady image)  
Neglected Stuff July 2025 - Use Your Unloved Stash (clock embossing folder, ribbon) 
 
Thanks for stopping by today.  Have a great day.
 
Stamps: Conjurer of Dreams 
Ink: None
Card Stock: Neenah White; Stampin Up
Accessories: Computer, Printer, Bling, Ribbon, 3D Glaze Pen, Glue

Monday, July 7, 2025

Floral Mushroom Gnome

Hello and welcome.  Today I'd like to share with you a card made using one of the images I colored while my husband's been in the hospital.  The images are from the Gnome One Like You set from Creative Worship Stamps.  I've had this set for a while and just hadn't used it until now.
 
After stamping the image/saying in memento tuxedo black ink onto white Copic X-press card stock, I colored everything using my Ohuhu markers.  Once the coloring was finished, I added some flower stems before stenciling my cloud background.  I then dug out my card stock scraps and Martha Stewart floral/butterfly punches to add to my scene.  After adhering some bling to the layered image panel, I added some tiny black dots for the butterflies.
 
Challenges entered:
 
 
Thanks for stopping by today.  Have a great day.
 
Stamps: Creative Worship Stamps
Ink: Memento Tuxedo Black; Tim Holtz Tumbled Glass
Card Stock: Copic X-Press; Stampin Up; Scraps
Accessories: MISTI, Ohuhu Markers, MS Punches, Glue, Bling, Stencil, Blending Brush, Brads, Glue Dots, Black Gel Pen 
  

Monday, March 25, 2024

A Little Steampunk Magic

 Hello and welcome.  I have a couple of cards to share with you that use pre-colored images from Gecko Galz.  
 
The first one up uses the free image for their monthly Steampunk challenge.  Now I don't make a whole lot of steampunk cards since it's out of my comfort zone, so I'm hoping this one is ok.  After printing the image off on Neenah white card stock, I cut it down to size and layered before adding brads and setting aside.  My card is dry embossed using a retro dots/swirls embossing folder in my big shot©.  I decided to highlight the embossed images before cutting, then embossing, a border strip using the embossed side for the border.  After adhering the layered image panel crookedly, deliberately, I dug out my Tim Holtz gear dies and die cut a couple of gears out of scrap card stock, then lightly stippled some walnut stain distress ink over the gears using a paper pouncer.  I then adhered the gears making sure to add some bling in the centers.  The final touch was some blue fibers I've had in my stash for years.

Challenges entered:
 
 
My second card is using the free image from February's monthly challenge at Gecko Galz.  I started out by printing the unicorn image on Neenah white paper before cutting it down to size, layering and adding brads.  I then printed off one of the Seasons of Hope digital papers, then added it to a pacific pointe card.  For some reason I decided to dry emboss the card at that point and use the debossed images before cutting a black border strip, dry embossed that and adhered using the embossed side.  I then color spritzed some pacific pointe marker over the card front before adding my layered unicorn using glue dots.  The only other embellishments were a black bling flourish and some blue fibers I've had in my stash for years.

Challenges entered:
 
 
Thanks for stopping by today.  Have a great day and rest of your week.

For Both Cards:
Stamps: Gecko Galz
Ink: Stampin Up Pacific Pointe; Tim Holtz Walnut Stain Distress
Card Stock: Neenah; Stampin Up; Gecko Galz Digital Designer Paper
Accessories: Computer, Printer, Big Shot, Cuttlebug Swirls and Retro Circles Embossing Folders, Stipple Brush, Paper Pouncer, Bling Flourish, Tim Holtz Gear Dies, Fibers


Monday, April 11, 2022

Jesus

Hello and welcome.  Today I'd like to share an Easter card made using a Stampabilities stamp I've had for sometime and never used.  Why you might ask?  I have no idea why I haven't used it before now.  

I started out by stamping it in Tim Holtz walnut stain distress ink onto Neenah white card stock before coloring it using Castle Arts pencils.  Once the coloring was finished, I stippled some tea dye distress ink over everything using my Picket Fence Studios blending brushes before layering and adding brads.  Before I added my layered panel to my card, at the last minute, I decided to distress the bottom edges of the layered panel using a Tonic distresser tool, then added it to my card using dimensionals.  I then stamped Jesus from a retired Taylored Expressions Yahweh mini set in walnut stain distress ink, layered, and distressed the bottom layer.  Since I didn't want to add any brads, but still wanted a finished look, I added some "faux brads" by punching some micro dots from scrap card stock then added using a Martha Stewart glue pen.  I then adhered it to my card also using dimensionals.  As my finishing touch, I added some Ranger Glossy Accents around the "dirt floor" of the card before mixing in some Stampin Up really rust embossing powder to make the "dirt floor" more real before highlighting the 3 nails my toddler Jesus was playing with using a 3D glaze pen.  I'm really happy with how it turned out since I made it while still dealing with a migraine.  Felt I had to focus on something beside dealing with the pain.

Challenges entered:
 
 
Thanks for stopping by today.  Have a great Easter week.

Stamps: Stampabilities; Taylored Expressions
Card Stock: Neenah White; Stampin Up
Ink: Tim Holtz Walnut Stain, Tea Dye
Accessories: Castle Arts Pencils, Distresser Tool, Ranger Glossy Accents, Dimensionals, 3D Glaze Pen, SU Really Rust Embossing Powder, Brads, Small Hole Punch, MS Glue Pen, PFS Blending Brushes

Tuesday, March 22, 2022

Dandelions, Catcus and Sunflowers

 Hello and welcome.  Today I'd like to share a few cards I've made in the last week using stamps that have never been used before (NBUS).  With all that's still going on in the world, and my health, I'm finding my coloring and crafting is giving me some peace of mind.  I'm still not happy with all that's going on in Ukraine.  Somebody needs to stop that madman before he bombs all of Europe.  Hopefully, something will come out of the NATO talks this week but I'm not going to hold my breath.  However, I digress.

My first card is made using all scraps and turned out to be a cute little note card using Lawn Fawn's set Dandy Day Flip Flop along with the matching dies.  Now where I live, the calendar says it's officially spring, however, someone forgot to tell Mother Nature.  We are jumping from the 60's to almost the 90's this week then dropping 20+ degrees next week.  I've got dandelions growing all over the place in my front yard and this card reminds me of them.  I started out by stamping everything twice on scrap Neenah white card stock before coloring using Castle Arts colored pencils before die cutting the second set of images.  Once everything was colored, and die cut, I layered the main image panel onto black scrap card stock then onto a small turquoise piece for the card.  I then popped up the die cut images (even those little itty bitty pieces) before adding a small scrap of bakers twine.  As an afterthought, I took a black artist pen and added some hand drawn birds (don't laugh), faux brads and faux stitching around the edges.

Challenges entered:


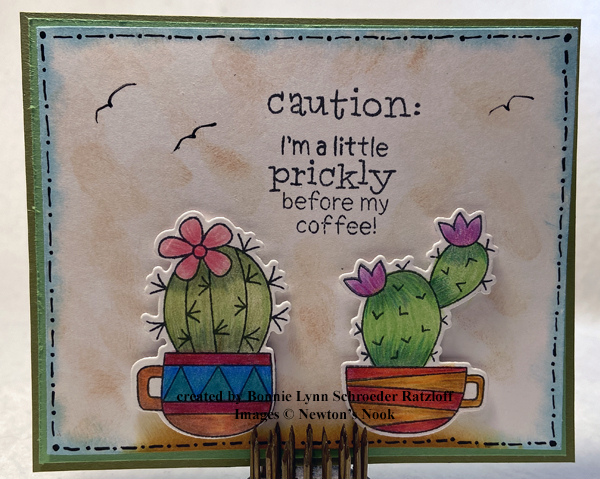
My second card uses a set from Newton's Nook that I've been dying to use called Cuppa Cactus and the matching dies.  I started out stamping my images twice onto some scrap Neenah white card stock to make into a one layer card before coloring using the Castle Arts pencils.  Once my coloring was finished, I die cut the images before popping them up using dimensionals and stippling some Tim Holtz distress inks around them using my Picket Fence blending brushes.  As an afterthought, I'm good for those, I took my one layer card and adhered it onto scrap green card stock before adding the faux stitching/faux brads using a black artist pen.  I kind of like how it turned out doing that.

Challenges entered:
Splitcoaststampers F4A630 - Hello Spring (I went with Spring in the desert)
Inspiration Station #26 - Rainbow (inspired by colors of inspiration pic)
Newton's Nook Inky Paws #169 - Think Spring (I went with Spring in the desert)
 
Inspiration Station
Newton's Nook Inky Paws Challenge


My third card uses the Sunflower Power digital image from Power Poppy as part of their Sunflowers For Ukraine images.  I started out by combining the sunflower, and saying, in a watermark program before printing onto Hammermill white card stock.  I then colored the image using Castle Arts colored pencils before softly blending Tim Holtz stormy sky distress ink around the edges using Picket Fence blending brushes.  I then layered my colored image before adding some vintage brads then adding to a summer sun card.  I wanted to keep my sunflower card as simple as possible so the image and saying stood out on their own.

Challenges entered:
 
 
Thanks for stopping by today.  Have a great week.

Dandelion Card
Stamps: Lawn Fawn
Ink: Memento Black; Tim Holtz Tumbled Glass Distress
Card Stock: Scraps
Accessories: Twine, Micro Pop Dots, Castle Art Pencils, Black Artist Pen, PFS Blending Brushes

Coffee Cactus Card
Stamps: Newton's Nook
Ink: Memento Black; Tim Holtz Tumbled Glass, Tea Dye; Adirondack Caramel
Card Stock: Scraps
Accessories: Castle Arts Pencils, Dimensionals, PFS Blending Brushes

Sunflower Card
Stamps: Power Poppy
Ink: Tim Holtz Stormy Sky
Card Stock: Hammermill White; Stampin Up; Scraps
Accessories: Computer, Printer, Castle Arts Pencils, Brads, Glue Dots

Monday, December 20, 2021

Joy To The World

Hello and welcome.  I'm playing along with a few challenges this Christmas week, so I thought I would bust out a retired clear set I've never used (NBUS) from The Cat's Pajamas called Joy To The World.  

Onefer
 
For my first project, I stamped the singing penguins, and musical notes, in memento tuxedo black ink and then colored using prismacolor and copic markers before highlighting one of the hats with a white 3D glaze pen.  I then stamped the saying also in memento black before highlighting using glitter gel pens.  I then took a Picket Fence Studio Slimline Cloud Stencil and added the background clouds using Picket Fence Blending Brushes and Tim Holtz stormy sky distress ink.  After layering, and adding brads, I added the panel to a card made pacific pointe card stock and scrap gingham designer paper.  I then took a black artist pen and added the faux sewing, snow using a white 3D glaze pen, and some Gin and Tonic sequins using Ranger Glossy Accents.  The final touches were waterfall ice stickles (for snow/ice) and white/silver ribbon.

Challenges entered:
 
 
Twofer

Since I had the Joy set still sitting out on my desk, I decided to stamp the penguins, and musical notes, onto some scrap white Neenah card stock then colored using the same prismacolor/copic markers.  I then dusted off my snowflake corner punch and punched the top corners before creating my clouds background using the Picket Fence Slimline Cloud Stencil and blending brushes along with Tim Holtz stormy sky distress ink to create my cloud background.  I then stippled broken china around the edges before layering then punching that with my Stampin Up scalloped tag punch.  After adding some "snowflakes" using a white 3D glaze pen, I added the punched snowflake bits (after stippling broken china on them) by adhering using Ranger glossy accents.  The final touches were waterfall ice stickles for the "ice" and ribbon to finish my tag off.

Challenges entered:
 
 
I'm please with how both of these turned out especially since I'm dealing with another migraine and it was either cry or try and focus on something else.  Also, my lung issues are flaring back up again I'm afraid.  
 
Thanks for stopping by today.  Have a a great day and a safe Merry Christmas!

Joy To The World card

Stamps: TCP Joy To The World
Card Stock: Neenah White; Stampin Up; Designer Paper Scraps
Ink: Memento Tuxedo Black; Tim Holtz Stormy Sky, Broken China; SU Pacific Pointe
Accessories: Prismacolor and Copic Markers, PFS Slimline Cloud Stencil, PFS Blending Brushes, PFS Gin and Tonic Sequins, Ranger Glossy Accents, Ribbon, Sakura 3D Glaze Pens, Ice Stickles, Brads, Glue Dots

Penguin Tag
 
Stamps: TCP Joy To The World
Ink: Memento Tuxedo Black; Tim Holtz Broken China, Stormy Sky, Milled Lavender
Card Stock: Neenah White Scrap; SU
Accessories: Prismacolor and Copic Markers, Snowflake Corner Punch, SU Scalloped Tag Punch, Stipple Brush, PFS Slimline Cloud Stencil, PFS Blending Brushes, Ice Stickles, Sakura White 3D Glaze Pen, Ribbon

Sunday, February 28, 2021

Ain't No Sunshine Sketch


Hello and welcome.  Today is another Stella Says Sketch over at Catch The Bug.  For my project, I am using a recently released image called Bugaboo Angels - Ain't No Sunshine.  However, I tipped the sketch on it's end and made a slimline card.  

After printing the image onto Hammermill white card stock, I colored it using Castle Art pencils with a blender pencil before blending Tim Holtz broken china and stormy sky distress inks around it using blending brushes from Picket Fence Studios.  I then took one of my stipple brushes and lightly stippled the broken china ink around the edges of the image panel before layering and adding brads.  I then stamped my card using a retired, and dusty, Stampin Up splat roller wheel and pink passion ink.  I  then took a scrap of some Colorbok Light Bright designer paper, added that, then sponged the pink passion ink around the edges of the card base before adding my layered image panel.  I then dusted off some Recollections flowers and a Marvy splat punch, added the flowers and the punched splat using micro glue dots.  After highlighting parts of the colored image/saying using Sakura 3D glaze and souffle pens, I then added some Spiked Ocean Water Sequins from Picket Fence Studios.  The final touch was diamond ice stickles highlighting the images "raindrops".

Challenges entered:
 
 
Thanks for stopping by today.  Have a great day.  Stay safe out there and please wear a mask!!

Stamps: Bugaboo; Stampin Up Splat Roller Wheel
Ink: Tim Holtz Broken China, Stormy Sky; Stampin Up Pink Passion
Card Stock: Hammermill White, Stampin Up
Accessories: Computer, Printer, Castle Art Pencils, Blender Pencil, PFS Sequins, PFS Blending Brushes, Stipple Brush, Glue Dots, Brads, Recollections Flowers, Marvy Splat Punch, Sponge
 

Wednesday, November 25, 2020

Black Friday Shopping

Hello and welcome.  It's Humor Me Wednesday at Bugaboo and today I'd like to share with you a card made in honor of Black Friday using Bugaboo's Stella Christmas Cost image.  
 
After printing the image onto Neenah white card stock, I colored it using Castle Art pencils and a blender pencil before stippling tumbled glass distress ink around it then layering and adding brads.  For the card, I used Graphic 45's 12 Days of Christmas designer paper on a handsome hunter card.  The image panel was added to the card using dimensionals then I pulled out some Making Memories felt flowers I've had for years and never used along with some poinsettia dew drops.  As an afterthought, I took a black artist pen and added some faux stitching to the image panel.

Challenges entered:
 
 
Thanks for stopping by today.   Have a great day, stay safe out there and wear a mask!!

Stamps: Bugaboo
Ink: Tim Holtz Tumbled Glass, Pine Needles
Card Stock: Neenah White, Stampin Up, Graphic 45
Accessories: Computer, Printer, Castle Art Pencils, Artist Pen, Brads, Dimensionals, Dew Drops, Felt Flowers, Glue Dots, Stipple Brushes, Blender Pencil, Gold Cord
 

Tuesday, June 16, 2020

How You Holding Up?


Hello and welcome.  Today I'd like to share a card made for my step-mom since my late step-dad's birthday was yesterday (June 15th).  I made the card using colors associated with pulmonary fibrosis since that's what he passed away from last year.  Although he never smoked a day in his life, he was a firefighter for over 40yrs.  Thankfully, now firefighters are provided the equipment to keep them safe, they are still exposed to hazards.  Smoke from fires, even second hand, are filled with all kinds of chemicals.  I should know.  I now have been diagnosed with second hand smoke induced chronic obstructive pulmonary disease and chronic bronchitis.  I've never smoked either, however, my mom, dad, and grandparents smoke cigarettes when I was young and that damaged my lungs.  Please, do not smoke around people.  You never know who much damage you're doing to someone else.

After printing off the image and saying from Bugaboo's How You Holding Up digital set onto Neenah white card stock, I colored using both prismacolor and copic markers before layering onto scraps and then adding to a blue card.  For the card background, I pulled out a very dusty and retired Stampin Up set called Boho Backgrounds and repeated stamped the image in adirondack sailboat blue onto the card. Once I added layered image, I punched out some matching "brads" from some scrap green card stock adhering using a Martha Stewart glue pen.  My final embellishments were a small silver bow, 3D glaze pens and a never before used (NBUS) bling flourish.  I'm happy with how this turned out since I'm still dealing with the same migraine I've had over a month now; just with varying degrees of pain.  

Inside


Challenges entered:

Pixie's Crafty Workshop #380 - Use Your Snippets 
Never Before Used Schtuff (NBUS) #15 - Use Your NBUS 
Splitcoaststampers WT795 - Unused Stamps 
CD Sunday Plus #37 - Anything Goes (Must be digital, CD, USB) 
All Fun Challenges #9 - Anything Goes
Dream Valley Challenges #227 - Summer Colors 

Thanks for stopping by today.  Have a great day!!

Stamps: Bugaboo, Stampin Up!
Ink: Adirondack Sailboat Blue
Card Stock: Neenah White, Stampin Up! Pacific Pointe, Wild Wasabi
Accessories: Computer, Printer, Prismacolor and Copic Markers, Small Hole Punch, MS Glue Pen, Small Bow, Bling

Wednesday, June 3, 2020

Thinking Of Morning Glories


Hello and welcome.  Today I'd like to share a sympathy card I made for a friend who recently lost her mother.  The image is a never before used (NBUS) digital from Impression Obsession and is called Morning Glories H1856-DG and is currently free on their site.  If you don't like using digital stamps, then you can purchase the rubber image here.

After printing off the image onto Neenah white card stock, I pulled out my prismacolor and copic markers and got to work.  Once the coloring was finished, it was layered onto larger scrap card stock and then added to a leaf green card.  I then took the saying from a retired MFP Stamp Shop set, cut it in two before stamping in memento black ink.  I then punched the photo frames from scrap cocoa card stock, framed my image, stamped the "dots" using Stampin Up's retired Itty Bitty Backgrounds then diamond ice stickles to the morning glory centers and on the sun.

Challenges entered:

Pammies Inky Pinkies #2022 - Anything Goes 
Colour Crazy Craft Week 21 - Anything Goes 
Arty Divas #23 - Anything Goes 
Outlawz Festive Friday May 29 to June 11 - Anything Goes 
Always Fun Challenges #165 - Layers 
Dream Valley Challenges #226 - Add Some Sparkle 
Word Art Wednesday Weeks #442 and #443 - Anything Goes

 Thanks for stopping by today.  Have a great day.

Stamps: Impression Obsession, MFP Stamp Shop, Stampin Up
Card Stock: Neenah White, Stampin Up, Scraps
Ink: Memento Tuxedo Black, Cocoa
Accessories: Prismacolor and Copic Markers, Ice Stickles, Glue Dots, SU Photo Corner Punch, Computer, Printer