Showing posts with label color crazy craft. Show all posts

Monday, December 12, 2022

PIP Challenge 2250

 Sponsored by SheepSki Designs


Hello and welcome.  Today begins a new challenge over at Pammie's Inky Pinkies and this week we are being sponsored by  Sheepski Designs.  I would first like to thank them for their sponsorship and for providing images for the design team to use.

After printing out my image onto white Hammermill card stock, I colored it using both Lyra and Castle Arts pencils before stippling Tim Holtz walnut stain and old paper distress inks using myPicket Fence Studios blending brushes to give the image an antique, or vignette, feel before layering and setting aside.  The card was dry embossed using Sizzix Tim Holtz woodgrain embossing folder with my big shot before stippling walnut stain and picket fence distress inks until I was happy with how it looked before adding the layered image panel.  I then die cut multiple pieces of scrap card stock using my Impression Obsession pine branch and pine sprig cluster dies before stippling spruce and walnut stain inks over the die cut pieces.  I then punched several more scrap pieces using my Martha Stewart  fern/hydrangea/pine sprig punches then stippling ink over those as well.  I then started adding my cut pieces to the card using glue dots before highlighting the floral centers using crystal ice stickles.  As a final touch, I added some glossy accents to the ale glasses to highlight the alcohol a bit.

Challenges entered:
 
 
Thanks for stopping by today.  Have a great day and don't forget to join in the challenge this week.

Stamps: Sheepski Designs
Ink: Tim Holtz Walnut Stain, Picket Fence, Old Paper; Stampin Up Spruce
Card Stock: Hammermill White; Stampin Up; Scraps
Accessories: Lyra and Castle Arts Pencils, MS Punches, IO Dies, Ice Stickles, PFS Blending Brushes, Brads, Glue Dots, TH Woodgrain Embossing Folder, Big Shot, Ranger Glossy Accents.

Wednesday, November 16, 2022

Awesome, Strong and Hot


 Hello and welcome.  First, I'd like to thank everyone for the well wishes for my husband.  He is doing a lot better.  My nerves are still messed up, and I still have a massive migraine, so.....I've been making a whole lot more cards to try and keep my mind occupied and calm the nerves; despite my migraine.  It's amazing how coloring calms you down even when coloring through somewhat closed eyes.  So I have a couple of cards to share with you today both for the Coffee Lovers Blog Hop.
 
First up is a card made using a set from The Cat's Pajamas called Tea Time.  Now I have the retired clear set, but the digital version can be found here. I mean, you gotta love Sprinkle, right?  After stamping my images in memento tuxedo black ink onto Hammermill white card stock, I pulled out my prismacolor and copic markers to color the image before stamping the saying then layering.  I went with a black/white color theme, with just a pop of pink to keep it simple. After adding some faux brads I lightly stippled some Tim Holtz tattered rose distress ink before adding a felt pink bow and highlighted parts of the Sprinkle using 3D glaze pens.
 
Challenges entered:
 
Crazy For Cats #1 - Anything Goes (featuring Sprinkle Cat)
 
 
Double D Challenges
 
 
My second card uses a digital image, Gnome Sweet Gnome, from Angie Blom Digital Designs and is colored using Lyra and Castle Arts pencils.  Once the coloring was finished, I layered it and added some button brads from my stash.  My card is dry embossed using a Cuttlebug pumpkin harvest embossing folder and my big shot with Tim Holtz fired brick distress ink stippled over the embossed images.  Once my image panel was added to the card, I color spritzed a garden green marker over the image panel. 

Challenges entered:
 
 
The Four Seasons
 
 A Place To Start

Thanks for stopping by today.  Have a great rest of your week.  

Strong and Hot Card
Stamps: The Cat's Pajamas
Ink: Memento Tuxedo Black; Tim Holtz Tattered Rose Distress
Card Stock: Hammermill White; Stampin Up
Accessories: Prismacolor and Copic Markers, Brads, PFS Blending Brush, Black Gel Pen, Sakura 3D Glaze Pens

Gnome Coffee Card
Stamps: Angie Blom Digital Designs
Ink: Tim Holtz Fired Brick Distress
Accessories: Computer, Printer, Lyra and Castle Arts Pencils, Brads, Big Shot, Cuttlebug Embossing Folder, Color Spritzer, SU Garden Green Marker, Glue Dots, PFS Blending Brush


Friday, November 11, 2022

Pumpkin Spice Coffee, Donuts and Sunflowers

 
Hello and welcome.  Today starts the Coffee Loving Cardmakers Fall/Winter blog hop.  For my project, I decided to use the Bloomin' Spring Coffee Basket digital stamp from Stamplorations in fall colors instead of spring since I love pumpkin spice latte's.  I also colored the daisies like sunflowers.

I started out by printing the image at 3.5 x 5 inches onto Hammermill white card stock then colored using both Lyra and Castle Arts pencils.  Once the coloring was finished, I lightly stippled some Stampin Up tangerine tango and always artichoke inks around it before layering.  For my card base, I repeatedly stamped the row of coffee cups from Stampin Up's Espress Yourself (retired) in tangerine tango ink before stamping the coffee beans in always artichoke ink on the border strip.  Once the card was assembled, I added some Ranger Glossy Accents for the donut "glaze" and on the coffee straws before adding some faux brads and faux stitching before adding some gold sequins from my stash.  As an afterthought, I took some Tim Holtz Stormy Sky distress ink and stippled some right underneath the basket for the shadow.  I'm really happy with how this turned out since I was making it while dealing with a migraine.

Challenges entered:
 
The Four Seasons November - Anything Goes Fall (inspired by colors - see pic below)
 
Thanks for stopping by today.  Have a great day.

Stamps: Stamplorations; Stampin Up
Ink: Stampin Up Tangerine Tango, Always Artichoke; Tim Holtz Stormy Sky
Card Stock: Hammermill White; Stampin Up
Accessories: Computer, Printer, Castle Art Pencils, Lyra Fleshtone Pencils, PFS Blending Brushes, Sequins, Bearly Arts Glue, SU Always Artichoke Marker, Ranger Glossy Accents, Small Hole Punch, Color Spritzer Tool
 
#fallwinter2022clh

Tuesday, November 1, 2022

The Best Thing To Hold

 
Hello and welcome.  I am thrilled to be guest designing this month over on the Never Before Used Schtuff (NBUS) challenge blog.  The idea of the challenge is to use all the fun stamps, dies, supplies, washi tape, etc that we have bought and just have not used.  So dig into that stash, and let's get into those supplies and pull out the schtuff we just had to have and use it!

My card for this month's challenge uses a digital stamp (Pooh Cards 1 Classic), and matching digital paper (Bee Classic Pooh), from Dina Kowal Digital.  Now the weather in California has finally decided to get with the program and let Fall be fall and not just a summer hangover.  Now if we could only get some desperately needed rain.  So, I let our freaky California weather help inspire my card.

After printing the image,  on to Hammermill white paper before pulling out my dusty, and rarely used, watercolor pencils and got to coloring.  After blending the colors using an alcohol marker, I took my Picket Fence Studios Slim Line Cloud stencil and blending brushes and go to making the image background using Tim Holtz stormy sky distress ink.  Once my clouds were finished, I took those unloved watercolor pencils and created a rainstorm to go with my blustery day before layering and adding some ruby red brads then adhering the layered image to a ruby red card base with the Bee Classic Pooh digital paper on it.  I then sponged some ruby red ink around the edges of the card before lightly dabbing some of the leftover ink into the lower left corner of the image panel.  Taking a small scrap of the digital paper, I fussy cut, yes fussy cut, three of the honey jars out then adhered them to the image panel before highlighting the honey overflow using a Sakura clear 3D glaze pen.  The final embellishment was crystal ice stickles as raindrops.  I'm really happy with how this turned out, especially since I made it while dealing with a bit of a migraine.

Challenges entered:


Thanks for stopping by today.  Have a fabulous week.

Stamps: Dina Kowal Digital
Ink: Tim Holtz Stormy Sky; Stampin Up Ruby Red
Card Stock: Hammermill White; Stampin Up
Accessories: Computer, Printer, Watercolor Pencils, Blender Marker, Brads, PFS Slim Line Cloud Stencil, Sponge, Ice Stickles, 3D Glaze Pen, Bearly Arts Glue

Monday, October 31, 2022

PIP Challenge 2244


 Sponsored by Polkadoodles


THEME is CELEBRATION!!
 
 
Hello and welcome.  Today starts a new challenge over at Pammie's Inky Pinkies.  This week we are sponsored by Polkadoodles.  I would first like to thank them for their sponsorship and for providing the design team images for us to use.  Since this is the 5th Monday for October, we have a theme this week and it's celebrations.  My project this week uses this cute little Gnometastic Celebration Balloons.

After printing my image onto Hammermill white card stock, I colored it using both Lyra and Castle Arts pencils before stippling Tim Holtz broken china distress ink around it using my blending brushes from Picket Fence Studios before layering and adding brads.  I then took my card base and dry embossed it using a dusty Cuttlebug birthday embossing folder and my big shot before rubbing Pacific Pointe ink over the raised images.  I then took some scrap pacific pointe card stock, stamped it using a retired Stampin Up Beyond The Basics set before layering and adding my border.  Once I added the layered image panel, I pulled out some dusty dew drops for the final touch.  
 
I'm really happy with how it turned out considering how awful I feel.  I got my latest COVID booster this last weekend and it sure has kicked my booty!  Ugh!  I do, however, recommend getting the latest booster especially since you don't know if the person next to you is high risk or not; like I am.  Otherwise get it to protect your own family.

Challenges entered:
 
Splitcoaststampers USEIT2022 - Use Your Unloved Stash (dew drops, embossing folder, brads) 
 
Thanks for stopping by today.  Have a great day and don't forget to join in our challenge over at Pammie's Inky Pinkies.

Stamps: Polkadoodles; Stampin Up
Ink: SU Pacific Pointe
Card Stock: Hammermill White; SU
Accessories: Computer, Printer, Big Shot, Cuttlebug Embossing Folder, Dew Drops, Pop Up Glue Dots, Brads, Glue Dots, PFS Blending Brushes, Lyra and Castle Art Pencils

Wednesday, October 26, 2022

Singing The Song Of Our Peoples


Hello and welcome.  Anyone who's ever been "owned" by a cat totally understands the middle of the night Opera "shows".  Possibly the furry "overlord" is expecting breakfast at 3am (or in my house it's 5am opera feed me alarm shows).  Perhaps your morning alarm isn't a clock but getting the "feed me" smack in the face?  I have and my toes have been bitten as an alarm.  Either way, cats have their own special way of reminding human servants who rules, and runs, the house.  With all of this in mind, my card for today's Cat Lovers Hop pays homage to our clever, sneaky but talented, furry members of our families.

I originally bought these stamps from the Rubbernecker Stamps booth from one of the stamp conventions held in San Jose, California (don't remember the name) at least 10-12 years ago and never used.  Boy did I get a steal from the Rubbernecker booth - several individual stamps and 3 grab bags all for a steal of a price.  My grab bags didn't have any duplicates either - now how often does that happen.  However, I digress.  I've checked the Rubbernecker site and don't see them for sale anymore. 
 
I started out by stamping the background in memento tuxedo black ink onto white card stock before stamping the remaining images (there are 5 total here) onto scrap white card stock before coloring using prismacolor pencils.  I then trimmed down the colored images before adhering them to my background using some Bearly Arts glue I received for my birthday then layered the panel.  I then stippled Tim Holtz chipped sapphire, walnut stain, and mowed lawn distress inks using blending brushes from Picket Fence Studios. After adding some white brads, I adhered the finished image panel to a navy card using glue dots.  The only other embellishments added were, crystal ice stickles around the moon and a clear glitter gel pen to create night stars in the sky and highlight the trash can lid.

Challenges entered:
 
 
Thanks for stopping by today.  Have a great day and don't forget to hop along (link is above).  I once again leave you with greetings of two more of my cats.

Puff aka THE Princess (and she knows it too LOL) (age 10)


Miss Lily - our loving but very timid lady (Puff's sister age 10)

Our dear, sweet Mama - she was a kitten who had kittens in our woodpile outside eating moldy lunches our son would hide from us back then.  As soon as we saw her and her kittens, they were upgraded to the guest bathroom with good foods, water and a warm/cool play to live.  She really was mama to Spot (day 2 hop), Bubba (day 1) Lily (day 3) and Princess Puff (day 3).  We kept her and her whole surviving litter.  The worst thing she did in life was ever so lightly tap on our foot/lower leg when she wanted pets.  She passed away Sept 2021 from kidney failure and seizures. The picture was taken the night before she passed.  She is so missed.


Stamps:  Rubbernecker
Ink: Memento Tuxedo Black; Tim Holtz Chipped Sapphire, Mowed Lawn, Walnut Stain
Card Stock: Stampin Up; Scraps
Accessories: Prismacolor Pencils, PFS Blending Brushes, Brads, Ice Stickles, Gel Pens, Glue Dots

Friday, October 21, 2022

Naughty And Nice


Hello and welcome.  Today I'm participating in the 2022 Build Your Stash Holidays Cardmakers Falling for the Holidays linky party.  I've finished my holiday cards for this year and wanted to get a head start on the ones for next year; plus for RAK requests.

I started out by stamping my images from The Cat's Pajamas The New Nice (I have the special red rubber set) that I've had for a few years in memento tuxedo black ink on to white card stock.  Thankfully The Cat's Pajamas has the set now in digital form.  Once all of my stamping was finished, I colored everything using Castle Arts pencils and a black Prismacolor marker before highlighting parts of my images using a black gel pen and Sakura 3D glaze pens.  After my colored image was layered, I added some green button brads I've had since last Christmas and didn't finish using.  My card is dry embossed using a Cuttlebug snowflake embossing folder before stippling glorious green ink over the raised images.  After adding my main image panel, I lightly rubbed some poppy red ink around my colored image before adding a green organdy ribbon from my stash.  The remaining embellishments are green sequins I found in my stash and crystal ice stickles highlighting the package ribbons  and centers of my dry embossed images.  I'm really happy with how this turned out and would like to also enter it into the following challenges.

Challenges entered:
 

Thanks for stopping by today.  Have a fabulous day and weekend.

Stamps:  The Cat's Pajamas
Ink: Memento Tuxedo Black; Stampin Up Glorious Green (retired)
Card Stock: Stampin Up; Scraps
Accessories: Castle Arts Pencils, Black Prismacolor Marker, Ribbon, Brads, Big Shot, Cuttlebug Embossing Folder, Sequins, Glue Dots, Crystal Ice Stickles, Sakura 3D Glaze Pen, Black Gel Pen


Wednesday, October 12, 2022

A Cat In The Hat?

Or is the cat in a jack? Or is the Jack at cat?  Hello and welcome.  Today I'd like to share with you a card made using one of Impression Obsession's Gary Robertson digital stamps called Cat in the Hat Jack.  I started coloring it a few days ago to try and get out of the funk I've been in even though I've been dealing with migraines. Fortunately, pain meds worked long enough to get it colored.
 
After printing the image at 3.5 x 5 to accommodate the migraine, I colored it using both Lyra and Castle Arts pencils before using a blender pencil on parts of the image.  Once the coloring was finished, I layered it then added some pumpkin orange brads.  My card uses a dusty Cuttlebug Pumpkin Harvest embossing folder run through a Big Shot before stippling some Stampin Up pumpkin pie ink over the raised images and around the edges using my Picket Fence blending brushes.  The final touches were highlighting various parts of the colored image using Sakura 3D glaze pens and adding some gold sequins I've had in my stash for years.

Challenges entered:
 
 
Two Old Bats Challenge
 
The Four Seasons
 
If You Give A Crafter A Cookie

 
Thanks for stopping by today.  Have a great day.

Stamps: Impression Obsession
Ink: Stampin Up Pumpkin Pie
Card Stock: Hammermill White Scrap; Stampin Up
Accessories: Lyra and Castle Arts Pencils, Blender Pencil, 3D Glaze Pens, Glue, Sequins, Brads, Glue Dots, Cuttlebug Pumpkin Harvest Embossing Folder, Big Shot, PFS Blending Brush

Just A Note About Frank

 Hello and welcome.  Life is just being crazy right now and my migraines, depression, plus other health and adulting issues, are just kicking my butt.  So what does one do when depression gets a hold of you?  Well, for me, I color, even with a migraine to try to relax and escape life for awhile.  With a nasty migraine, I just hide in a very dark room with a washcloth over my eyes which is where I've been for the past few days.  I do have a couple of cards to share.  One was completed before finding out a family friend, Stacy,  whom I had lost contact with, was killed in a bicycle accident.  I do want to talk about Stacy but first I'd like to share a couple of cards.

First up is a card made with one of the clearance finds I made at Hobby Lobby a couple of weeks ago.  It's sat colored, just not assembled.  Assembling this card helped me focus on something else and forget about life for a few minutes.  The image, House Mouse Bumble Bee Fun, (now retired) is stamped in memento tuxedo black ink before being colored using both Lyra and Castle Arts pencils.  The background is stenciled using Picket Fence's Slimline Cloud Stencil along with Tim Holtz Stormy Sky distress ink and a Picket Fence blending brush before layering.  Since I didn't have matching brads, I made my own using a small hole punch and a MS 2-way glue pen.  For my embellishments, I added a small bow, crystal ice stickles for the bees wings/flower centers and a couple of bee stickers I've had for YEARS in my stash.  I'm surprised they still stick!  The saying is an old Rubberstampede stamp I received from a friend.

Challenges entered:


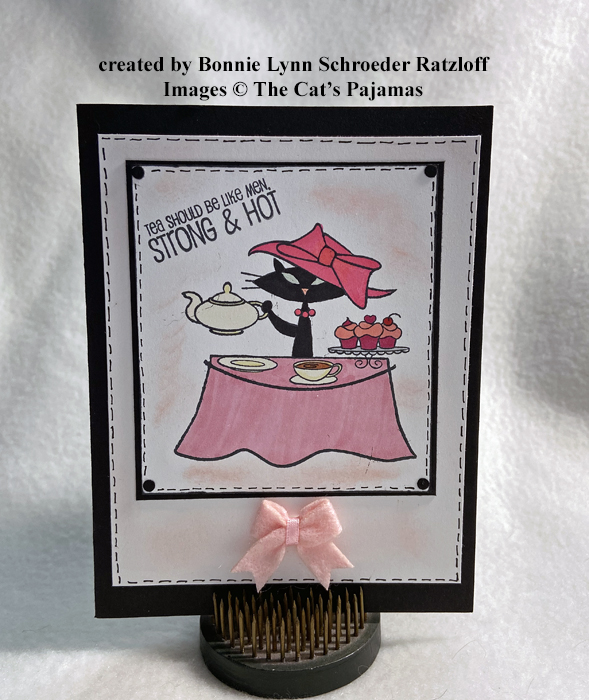
My second card uses a set I had bought for World Cardmaking Day from Picket Fence Studios as part of their WCD stamp bundle.  I started out by stamping the main image from So Franken Cute in memento tuxedo black ink before coloring using both prismacolor and copic markers then layering and adding brads.  The background is stamped using green galore ink and a long retired Stampin Up Halloween background set.  After color spritzing some green galore ink over the main image panel, I added some black brads and green sequins I've had in my stash for years as well.
 
 
Two Old Bats Challenge
  
The Four Seasons Challenge

 Inspiration Station Challenge
 
 If You Give A Crafter A Cookie
 
Double D Challenges
 
 Once Upon A Time Challenge
 
Now a bit about Stacy.  Stacy started out as just my sophomore anatomy/physiology teacher in high school.  She made learning a blast and remembering what you learned easy.  I never met a teacher like her before, nor have I met one like her since.  She and her husband became family friends that year and remained that way until I lost contact when they moved and with the birth of my son. A few years ago, I thought I found her on Facebook, but didn't have the courage to reach out at the time.  I'm regretting that decision now.  I will write more about her in a separate post because she is/was a very special person.

Thanks for stopping by today.  Have a great day and don't forget to hug family and friends plus tell them how much they mean to you.  You may regret it later.

House Mouse Card
Stamps: Stampendous; Rubberstampede
Ink: Memento Tuxedo Black; Tim Holtz Stormy Sky
Card Stock: Hammermill White; Stampin Up
Accessories: Lyra and Castle Arts Pencils, Crystal Ice Stickles, PFS Slimline Cloud Stencil, PFS Blending Brush, Bow, Bee Stickles, Glue Dots.

Frank Card
Stamps: Picket Fence Studios; Stampin Up Halloween Background (retired)
Ink: Memento Tuxedo Black; SU Green Galore
Card Stock: Hammermill White; Stampin Up
Accessories: Prismacolor and Copic Markers, Sequins, Glue, SU Green Galore Marker, Color Spritzer Tool, Orange Glitter Gel Pen

Thursday, October 6, 2022

Gnome Sweet Gnome

 
Hello and welcome.  Today I'd like to share a card using an image I've colored to keep from going crazy over the last few weeks while my husband has been watching the news.  The image is from Impression Obsession and is called Home Sweet Gnome and is part of the Gary Robertson digital line.

I started out by printing the image onto Hammermill white card stock before coloring it using both Lyra and Castle Arts pencils.  Once the image was colored, I layered it and added vintage brads before adhering it to a coffee colored card base.  The only other embellishment used was crystal ice stickles and a clear Sakura 3D glaze pen highlighting parts of the images.

Challenges entered:
 
 
Thanks for stopping by today.  Have a great day.
 

Stamps: Impression Obsession
Card Stock: Hammermill White; Stampin Up
Accessories: Lyra and Castle Arts Pencils, Sakura 3D Glaze Pen, Brads, Pop Up Glue Dots, Crystal Ice Stickles.
 

Saturday, September 24, 2022

Much More Friendly With Two

 
Hello and welcome.  Today I'd like to share with you another cute Pooh Bear image from Dina Kowal Digital Designs.  The set this image is in is Pooh Cards 1 Classic.  I started out by printing the image onto Hammermill white card stock before coloring it using both Lyra and Castle Arts pencils.  Since I wanted a "vintage" look, I then stippled some Tim Holtz walnut stain distress ink using my Picket Fence blending brushes before layering.  Once layered, I added it to a chocolate chip card with some Classic Pooh digital designer paper also from Dina Kowal Digital Designs.  I then stippled more walnut stain distress ink around of the edges of the card before adding some vintage pearls, from my stash, instead of brads.

Challenges entered:
 

Thanks for stopping by today.  Have a fabulous rest of your weekend.

Stamps: Dina Kowal Digital
Ink: Tim Holtz Walnut Stain
Card Stock: Hammermill White; Stampin Up; Dina Kowal Digital
Accessories: Computer, Printer, Lyra and Castle Arts Pencils, PFS Blending Brushes, Primas, Pearl Bling, Glue Dots

Thursday, September 22, 2022

Lighting Candles and Listening Friends

Hello and welcome.  Although I'm still dealing with migraines, I needed a couple of birthday cards for some in-laws so I decided to pull out my Art Impression Fire Out set to make one.  I just LOVE this set to use for nice snarky birthday cards.  My late step-dad would have loved this set too since he was a fire captain for Cal Fire here in California. 

I started out by stamping my image/saying in memento tuxedo black ink onto a white scrap before coloring using Lyra and Castle Arts pencils.  Once my coloring was finished, I stippled some Tim Holtz Tattered Rose distress ink and Stampin Up Rose Red ink around/over the image panel before layering and adding some brads.  I then added the layered panel onto a rose red card that was dry embossed using a Cuttlebug birthday embossing folder and my big shot. I then stippled more rose red ink around the edges of the card.  The only other embellishments added was a pink organdy ribbon on the side and using a Sakura 3D glaze pen for the glasses.

Challenges entered:
Shopping Our Stash #479 - Hey (h)Ombre (I went with different layers of pink to red)


My second card to share is using an adorable Pooh and Piglet image from Dina Kowal Digital designs.  The image is Classic Pooh and I love how some of the images in the set are already combined for an A2 sized card.  Although I can work with digital stamps, I'll admit to still trying to figure out my Photoshop program.  

After printing the image onto Hammermill white card stock, I colored is using my dusty Prismacolor watercolor pencils and blender marker.  Once my coloring was finished, I stippled some Tim Holtz Tumbled Glass and Walnut Stain around the edges of the colored image and my card base.  Once I had my image panel layered, I added some faux brads before adding to my card.  The card base also had a panel of Classic Pooh digital paper.  The only embellishments added was some primas flowers I've had for years and some crystal ice stickles highlighting the snowy path, faux brads, and center of the flowers along with some kraft thread on the side.

Challenges entered:
As You Like It Sept 2022 - Favorite Metallic or Glitter (ice stickles glitter glue because it's the easiest way to add sparkle when you have cats in the house)
 
Thanks for stopping by today.  Have a great rest of your week.

Light The Candles card:
Stamps: Art Impressions
Ink: Memento Tuxedo Black; Stampin Up Rose Red
Card Stock: Hammermill White; Stampin Up
Accessories: Lyra and Castle Art Pencils, Blender Marker, Sakura 3D Glaze Pen, Ribbon, Brads, Pop Up Glue Dots, PFS Blending Brushes, Big Shot, Cuttlebug Birthday Embossing Folder
 
Friend Listens Pooh
Stamps: Dina Kowal Digital Designs
Ink: Tim Holtz Tumbled Glass, Walnut Stain
Card Stock: Hammermill White; Stampin Up; Dina Kowal Digital Classic Pooh DP
Accessories: Computer, Printer, Prismacolor Watercolor Pencils, Blender Markers, Crystal Ice Stickles, Small Hole Punch, MS 2-Way Glue Pen, Prima Flowers, Kraft Thread, Glue Dots, PFS Blending Brushes