Showing posts with label House Mouse. Show all posts

Wednesday, May 27, 2026

Woodblock Wednesday May 2026 Edition


 Hello and welcome.  Today begins a new Woodblock Wednesday where we dust off those old wooden block stamps and show them some love.  My card today features one of my favorite House Mouse stamps with the matching wood block saying.  I haven't used my House Mouse stamps in a long time.  I've collected some, just haven't used them.....yet. In fact, it's so old the stamp block still says ©Stampa Rosa on it.  Spellbinders now holds the copyright for the House Mouse line.
 
My card is stamped using memento tuxedo black ink and colored using my old prismacolor markers before layering and adding brads.  The card is embossed using an old Cuttlebug© snowflake embossing folder with my Big Shot©.  The only embellishments I added was a clear 3D glaze pen for the bows before adding stardust stickles to highlight.
 
Challenges entered:
 
Peace On Earth #112 - See Pic Below (inspired by animal trio)
 
 
Peace On Earth
 
 
Thanks for stopping by today.  Have a great day.
 
Stamps: Stampa Rosa
Ink: Memento Tuxedo Black
Card Stock: Hammermill White; Stamping Up
Accessories: Markers, Brads, Big Shot, Embossing Folder, Glue Dots, Stickles, 3D Glaze Pen  


Friday, September 1, 2023

Woodblock Wednesday August 2023 edition


Hello and welcome.  Today begins the new Woodblock Wednesday challenge.  This monthly challenge inspires us to pull out those woodblock stamps (we all have them) that we're not using, and show them some love.  Since I'm behind making my Christmas cards for this year, I pulled out a couple of House Mouse stamps to use.

I started out by stamping my images in memento tuxedo black ink on some Copic X-press It card stock before coloring using both Prismacolor and Copic markers before stippling some Stampin Up soft sky ink around the edges and to fill in the white spaces.  I then layered the image panel and added some metallic red brads before setting aside.  Taking a retired Stampin Up holly jumbo wheel, I stamped the card base with Tim Holtz fired brick distress ink before adding the layered image panel using glue dots.  The final touch was adding some crystal and waterfall ice stickles. Here's the woodblock stamps I used: 


Challenges entered:
 
Park Hopping My Happy Place September 2023 - Anything Goes Inspired By Theme Parks (inspired by Christmas decor in Disneyland and the cat that caught a mouse in Pirates of the Caribbean in Disneyland)
 
Thanks for stopping by today.  Have a great weekend!
 
Stamps: Stampabilities; Stampa Rosa (closed); Stampin Up 
Ink: Memento Tuxedo Black; Stampin Up Soft Sky
Card Stock:  Hammermill White; Stampin Up
Accessories: Prismacolor and Copic Markers, Brads, PFS Blending Brush, Glue Dots, Ice Stickles

Tuesday, August 9, 2022

Graceland Christmas Blessings

Hello and welcome.  I'm fully into a Christmas mood right now even though it's 92 degrees outside at 6:30 pm.  I'm thinking if I keep making Christmas cards, the hot weather will go away and not come back.  With that in mind, I have a couple of Christmas cards to share for some challenges
 
First up is a retired Thomas Kincade  stamp from Cornish Heritage Farms (now closed) called Graceland Christmas.  I've had this stamp for some time and don't think I've used it yet but I could be wrong.  My image is stamped in Tim Holtz chipped sapphire distress ink before layering.  The only embellishment are some silver enamel dots instead of brads.  I kept the card clean and simple so the beauty of the stamp comes out more.

Challenges entered:
 
Peace on Earth #21 - Anything Goes Christmas (inspired by blue/white theme)
 
Peace On Earth
 
Jingle Belles
 
Stamps: Cornish Heritage Farms
Ink: Tim Holtz Chipped Sapphire
Card Stock: Hammermill White; Stampin Up
Accessories: Silver Enamel Dots
 
Next up is a couple of adorable mice making themselves a cup of Christmas cheer. I had originally stamped the image some time before our move to make a project with it, and thought I kept the stamp but it must have gotten lost in our move. In fact, I had an entire Rubbermaid sweater box full of House-Mouse stamps and I can't find it.  That's SO DEPRESSING too. I have no idea what the name of the stamp is anymore but it is stamped in black ink and I just finished coloring it using Castle Arts pencils before stippling raspberry ink around it then layering.  I then added it to a raspberry card with a dry embossed layer.  Since I couldn't find any matching brads, I made my own by punching some scrap card stock then adhering using a Martha Stewart 2-way glue pen.  The saying is stamped on scrap white card stock before punching it out and a layer for .  The final touches was adding some gold cord and color spritzing bravo burgundy marker over the image and saying.

Challenges entered:
 
Never Before Used Schtuff (NBUS) #41 - Use Your NBUS (my NBUS is the embossing folder & saying) 
 
Stamps: House-Mouse
Ink: Black; Stampin Up Raspberry
Card Stock: White; Stampin Up
Accessories: Sizzix Basic Gray Starry Night Embossing Folder, Big Shot, PFS Blending Brush, Small Hole Punch, Pop Up Glue Dots, Gold Cord, Castle Arts Pencils, SU Oval Punches
 
 
Thanks for stopping by today.  Have a great rest of your week.


Tuesday, July 5, 2022

Friday, July 1, 2022

The Great Honey Pot Caper

 Hello and welcome.  Today I'd like to share with you a card made using this cute Gruffies wooden stamp called Biggly Honey On The Run (stamp has the Honey On The Run on the side).  I've had this stamp for years and have never used it before now (NBUS)

I started out by stamping my image in memento tuxedo black onto Neenah white card stock before coloring using both Lyra and Castle Arts pencils before lightly stippling Tim Holtz Stormy Sky distress ink around the edges then layering.  Once I had added some brads, I popped up the layered image panel using pop up glue dots.  The only other embellishments were adding some crystal ice stickles and a Sakura 3D glaze pen to highlight the bees and "movement" of Biggly.

Challenges entered:
 
 
Thanks for stopping by today.  Have a great day.

Stamps: Stampendous
Ink: Memento Tuxedo Black; Tim Holtz Stormy Sky
Card Stock: Neenah White; Stampin Up
Accessories: Lyra and Castle Arts Pencils, Brads, Pop Up Glue Dots, Ice Stickles, Sakura 3D Glaze Pen

Monday, June 20, 2022

Biting Me and More VSN

 Hello and welcome.  Today I'd like to share with you a couple of cards, and a tag, made for Splitcoaststampers Virtual Stamp Night and a few other challenges.

First up is a tag made using a mini set I won a couple of years back from Visible Image and hadn't used yet.  I don't see it listed anymore on their website so it must be retired now.  I started out by stenciling a dot background using a couple of Tim Holtz Multi Shifter Dots Stencils using fired brick and stormy sky distress inks before over stamping my images in memento tuxedo black.  After layering my image panel to create a tag, I added some ribbon scraps and red sequins from my stash adhering the sequins using glossy accents.  I'll add it to a card later.

Challenges entered:


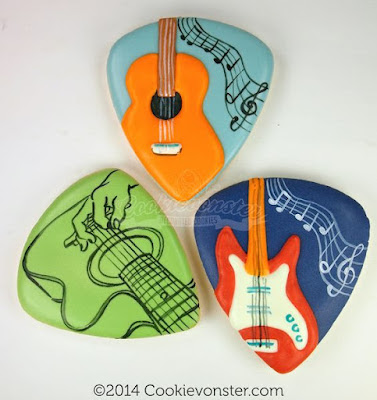
Next up is a card made using a different Visible Image's set Rock Out.  I started out by creating my background by running a Tim Holtz tumbled glass and wild honey distress inks over my image panel before adding some Tim Holtz Multi Shifter Stencil dots by applying broken china and spiced marmalade distress inks using Picket Fence Studios blending brushes.  Once I was satisfied with my background, I stamped out my images in memento tuxedo black ink before layering and adding brads.  The card is stamped in broken china ink using Visible Image's Ink Splats.  After popping up my layered image panel, I added some Spiked Ocean Water sequins adding them using Glossy Accents.

Challenges Entered:
 
If You Give A Crafter A Cookie #169 - June (inspired by colors/guitars)
 

 If You Give A Crafter A Cookie


Finally, I have a cute little House Mouse card made using the retired Hummingbird Express and Too Cute saying.  Although Stampendous now produces the House Mouse line, my stamps are from Stampa Rosa which is closed down.  I started out by my image, and saying, in memento tuxedo black on a Hammermill white scrap card stock, before coloring using Castle Arts pencils then stippling tumbled glass distress ink around the edges and layering.  After adding some black brads, I added some crystal ice stickles to finish it off.

Challenges entered:
 
 
Thanks for stopping by today.  Have a great day.

Bite Me Tag
Stamps: Visible Image
Ink: Memento Tuxedo Black; Tim Holtz Stormy Sky, Fired Brick Distress Inks
Card Stock: Scraps
Accessories: Ribbon, Tim Holtz Stencils, PFS Blending Brushes, Sequins, Ranger Glossy Accents

Rock Out Card
Stamps: Visible Image
Ink: Memento Tuxedo Black; Tim Holtz Tumbled Glass, Wild Honey, Broken China, Spiced Marmalade Distress Inks
Card Stock: Hammermill White; Stampin Up
Accessories: PFS Blending Brushes, Brads, Tim Holtz Stencils, PFS Sequins, Ranger Glossy Accents

Hummingbird Express
Stamps: Stampa Rosa
Ink: Memento Tuxedo Black; Tim Holtz Tumbled Glass
Accessories: Castle Arts Pencils, Stipple Brush, Brads, Glue Dots, Ice Stickles

Monday, October 6, 2014

Clean And Simple With Hope Plus More NBUS #5


This month's Virginia's View challenge is all about clean and simple, so I pulled out a stamp I haven't used since I bought it years ago from Stampabilities House Mouse line.  After stamping in memento black, I colored everything in prismacolor pencils then stamped the message using a retired My Sentiments Exactly clear set and I was done.  I also made this card for the SCS Hope You Can Cling To 1401B - Shine On challenge for Breast Cancer Awareness month.

Stamps: Stampabilities, My Sentiments Exactly
Ink: Memento Black
Card Stock: White
Accessories: Prismacolor Pencils

Wednesday, June 3, 2009

Pencils, Kincade and Mice!

Have you ever had a total "oh duh!" moment? I had one of those in Michaels the other day when I was pricing their Koh-I-Noor woodless pencils and comparing them to the prices online. I have an old set that needs replacing plus a Prismacolor 72 pencil set I bought on ebay several years ago and have never gotten the "full effect" out of them since I can't use mineral spirits or gamsel with my asthma. While I was in that particular aisle, I saw Prismacolor's new "pencil accessory set" that contains their blender pencil, alcohol marker blender, eraser, pencil extender/extension, and some other do-hickey I've never seen before.

What really caught my eye was the alcohol marker blender. I use that to blend my Prismacolor markers!!! Well duh! You mean to tell me I could have been using that blender marker all this time with my pencils? After seeing that set, I got out of Michaels in record time to get home and try it out on a couple of images I had colored when my husband came home from the hospital after having surgery for a broken ankle.


The first image I tried blending was a House Mouse one from Stampendous, and it came out beautifully! Just like I do when I'm blending with my markers, I started with the lighter colors first, beginning in the middle and then working to the outside.

Once I was done blending everything, I then stippled Stampin Up soft sky ink lightly over everything to give a soft "satin" feel to the image and the card once I started assembling it. I made sure the embellishments used were small to match the "size" of the mouse.


Here's a close up of the card details:


After finishing with my House Mouse card, I began to wonder how this technique would look with a more detailed image so out came one of my Thomas Kincade images I had received in a swap. Now this image was a little bit of an unknown since it was stamped in Tim Holtz walnut distress ink so I wasn't sure if the ink would run when the pencils were blended. As you can see, the ink stayed put and everything blended great. In fact, I think this technique works great with Cornish Heritage Farms Thomas Kincade images. With the image below, I didn't color in the sky, but chose to stipple it instead with Stampin Up soft sky dye ink again.


And a close up of the card:


I'm really happy with the way these cards turned out and just wish I had discovered I could use my blender marker a whole lot sooner. Needless to say, I have a bunch of blender markers on order. :)

Stamps: Cornish Heritage Farms Thomas Kincade Church In The Woods, Stampendous House Mouse
Ink: Tim Holtz Walnut Distress Ink, Black, Stampin Up! Soft Sky
Accessories: Stipple Brush, Brads, Photo Corners, Ribbon Bow, Mini Glue Dots, Koh-I-Noor Woodless Pencils, Prismacolor Marker Blender
Cardstock: Mauve Mist, Celery, Soft Sky, White, Close To Cocoa, Going Grey, Garden Green