Monday, August 26, 2024

Goth, Christmas and A Few Parasols

Hello and welcome.  It's been rough the last few days thanks to my migraines.  Part of it is stress, from mom's passing and bills, but also the weather change.  Mother Nature can't make up her mind.  If it's going to be hot, then be hot but if it's going to be cool/windy, then be cool/windy and not this weather whiplash stuff that's been going on.  Enough of that for now.  I'd like to share a few cards made over the last several days while trying not to cry from the pain and focus on something else.

First up is a Goth/Halloween card made using this month's freebie from Gecko Galz for the challenge this month.  After printing the image on Neenah card stock, I trimmed it down to size and layered before distressing plus adding black brads.  Setting that aside, I stenciled my card using a retired Newton's Nook spiderweb stencil, blending brush and Memento tuxedo black ink.  After adhering my layered image panel using glue dots, I then stamped the saying from a retired Picket Fence Studios Halloween set on scrap white card stock.  Once I had gone over the saying using a black 3D glaze pen, I distressed the edges before blending some retired going grey ink and adhering to my card.  The final touches were some black/silver fibers I found in my stash and some Crafty Meraki Midnight Shimmer Illusion bling.  I'm really happy with how my card turned out.

Challenges entered:
 
 
Stamps: Gecko Galz; Picket Fence Studios
Ink: Memento Tuxedo Black; SU Going Grey
Card Stock: Neenah; Stampin Up; Scrap
Accessories: Computer, Printer, Stencil, Blending Brush, Bling, Glue, Brads, Glue Dots, Fibers, 3D Glaze Pen, Black Gel Pen

Next up is a Christmas card made using the freebie image from Gecko Galz for their monthly Christmas challenge.  After printing the image onto Neenah card stock, I trimmed it down to size before layering and setting aside.  Taking my dusty Cuttlebug© snowflake embossing folder, and Big Shot©, I dry embossed my card before adhering the layered image using glue dots.  I then took four tiny snowflakes left over from punching scraps, and added those as faux brads before die cutting the JOY word twice to layer for dimension.  Once the layered saying was dry, I sponged some sage shadow ink over the word so it would stand out a bit before adhering it using Ranger© Glossy Accents.  Since I didn't have any matching fibers, I too some white/silver fiber and dyed it using the sage shadow ink and a sponge.  Once dry, I tied it around the left side of the card then added holly/diamond ice stickles for some sparkle.  I'm also happy with how this one turned out.

Challenges entered:
 
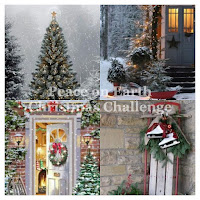
Peace On Earth #70 - See Inspiration Pic Below (inspired by snow, all green colors)


Stamps: Gecko Galz
Ink: SU Sage Shadow
Card Stock: Neenah; Stampin Up
Accessories: Computer, Printer, Ice Stickles, Big Shot, JOY Die, Sponge, Fibers, Snowflake Punch

Finally, I have a clean and simple (CAS) card made using one of the Gecko Galz Beautiful Backgrounds digital stamp set.  After printing it off onto Neenah white card stock, I colored it using my Castle Arts Watercolor pencils and a blender pencil before layering and adding brushed gold brads.  The only embellishment added was diamond ice stickles added to the kimono.

Challenges entered:
 
Gecko Galz Facebook Aug 2024 - Clean And Simple (brads/ice stickles only embellies)
 
Gecko Galz Facebook
 
 
Stamps: Gecko Galz
Ink: None
Card Stock: Neenah; Stampin Up; Gold Designer Paper
Accessories: Computer, Printer, Castle Arts Watercolor Pencils, Blender Pencil, Brads, Ice Stickles
 
Thanks for stopping by today.  Have a great day and rest of your week.
 

Saturday, August 24, 2024

Eastern Beauty

 
Hello and welcome.  I have another card to share using products from Gecko Galz.   

I started out by combining the image from Asian Beauties #2 (possibly retired) with the gold bamboo designer paper from Asian Botanicals before printing it out on Neenah white card stock then layering and setting aside.  I then printed a "blank" bamboo layer and adhered that directly to the card base and added some gold ribbon from my stash.  After adding the layered image, I added some gold epoxy stickers in the corners before adhering a brushed gold coin using Glossy Accents.  Taking some scrap red/gold pieces, I punched out some flowers using my Martha Stewart Hydrangea punch before shaping and adhering using the glossy accents.  The final touch was adding gold and holly ice stickles to the flower centers.  I'm pretty happy with how this turned out.

Challenges entered:
 
 
Gecko Galz Facebook
 
Gecko Galz Monthly Customer Challenge

Thanks for stopping by today.  Have a great rest of your weekend.

Stamps: Gecko Galz
Card Stock: Neenah; Stampin Up; Scraps
Ink: None
Accessories:  Computer, Printer, MS Punch, Ranger Glossy Accents, Epoxy Stickers, Ribbon, Glue Dots, Coin Charm
 

Mine!!


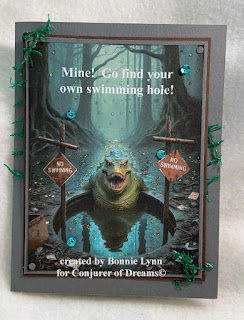
Hello and welcome.  Today I'd like to share with you an easy card I made using Conjurer of Dreams pre-colored digital image No Swimming.  With Halloween just around the corner, and all of the new scary movies coming out, I figured why not.  Right?  

I started out by combining the image, and saying, in Photoshop© before printing the image on Neenah white card stock, I layered it before adding some faux brads.  I then cut a strip of recycled avocado mesh and adhered it to the back of my layered image panel using glue dots making sure to "wrap" some of the mesh around the corners to kind of look like garbage.  Taking more glue dots, I then adhered the layered panel to my card before trimming any excess mesh I didn't want showing.  After adding a few Picket Fence Spiked Ocean sequins and some diamond ice stickles, my card was finished.  Creepy enough? ;)  Maybe not your traditional Halloween image but if it's scary and creepy it works in my book.

Challenges entered:
 

Thanks for stopping by today.  Have a great day.

Stamps: Conjurer of Dreams
Ink: None
Card Stock: Neenah; Stampin Up
Accessories: Computer, Printer, Photoshop, Sequins, Glue, Ice Stickles, Faux Brads, Glue Dots, Recycled Mesh Bag

Tuesday, August 20, 2024

Relax And Dream

 
Hello and welcome.  Today I'd like to share a couple of cards I finally finished.  First up is one using this Zen Time image from Penguin Palace.  I've been needing to take time myself since my mom passed away and my migraines are just getting worse.  I'm sure it's the stress and lack of sleep, but I needed some "playtime" myself.

I started out by printing the image on Neenah white card stock before coloring using my Castle Arts watercolor pencils along with a blender pencil.  Once the coloring was finished, I blended some barely banana ink to help fill in the white space, layered it and added brads before setting aside.  The card is made by dry embossing a Cuttlebug© leafy branch embossing folder with my Big Shot©.  I then popped up the layered image panel using pop dots before gluing some Making Memories© paper flowers from my stash beneath the image.  The final touches were color spritzing a bit of bashful blue marker over everything, adding diamond ice stickles to the water/glass and Ranger© glossy accents to the clock face.  I'm happy with how this turned out.  

Challenges entered:
 
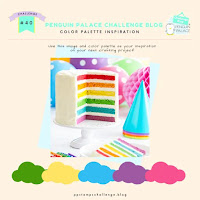
Penguin Palace #40 - Rainbow (used pastel rainbow colors)
Crafter's Cafe #311 - Rainbow (used pastel rainbow colors)
 
Penguin Palace
 
 
Inspiration Station
 
Stamps: Penguin Palace
Ink: Stampin Up Barely Banana
Card Stock: Neenah; Stampin Up
Accessories: Computer, Printer, Watercolor Pencils, Blender Pencil, Brads, Big Shot, Cuttlebug Embossing Folder, Paper Flowers, Ice Stickles, Glossy Accents, Blending Brush


Next up is a card made using this gorgeous freebie from Conjurer of Dreams in their Facebook group.  I started out by combining the image, and saying, in Photoshop© then printed it on Neenah white card stock then layered and added metallic pink brads from my stash.  I then dug through all of my ribbon until I found the pink velvet spool I was looking for and added that to the edge.  I then pulled out several scrap pieces of card stock, and my Martha Stewart punches, and punched several ferns, flowers and pine sprigs before running them through my dusty paper crimper.  Using Ranger© glossy accents, I created my floral sprays before adding some punched butterflies to the top.  The final touch was adding fruit punch ice stickles to the flower centers and stardust ice stickles randomly for the water and background.

Challenges entered:
 

Stamps: Conjurer of Dreams
Ink: None
Card Stock: Neenah; Stampin Up; Scraps
Accessories:  Computer, Printer, MS Punches, Glossy Accents, Ice Stickles, Ribbon, Paper Crimper, Brads, Glue Dots
 
Thanks for stopping by today.  Have a great day.
 

Saturday, August 17, 2024

It's The Most Wonderful Time Of The Year

 
Hello and welcome.  I'm still playing catch up on posts for cards I had started before the passing of my mom.  So, today I'd like to share with you a card made using one of the My Favorite Things stamp sets I recently received thanks to a gift certificate from @kreabymik.   

I started out by stamping images/saying from Christmas Carols in memento tuxedo black ink using my MISTI.  I then stamped the snowflakes in Tim Holtz broken china distress ink using an acrylic block before coloring everything using my Castle Arts watercolor pencils and a blender pencil. Once my coloring was finished, I blended some Tim Holtz stormy sky distress ink for the background using my blending brushes before layering and adding brads and adhering to the card using glue dots.  I then dug out of my stash some white/silver thread and tied it across the top before adding a silver snowflake charm I've had for years.  The final touch was adding some waterfall and diamond ice stickles to the snowflakes and sidewalk.  I'm really happy with how this turned out.

Challenges entered:
 
 
Thanks for stopping by today.  Have a great day.

Stamps: MFT
Ink: Memento Tuxedo Black; Tim Holtz Broken China, Stormy Sky Distress
Card Stock: Neenah; Stampin Up
Accessories: MISTI, Castle Arts Watercolor Pencils, Blender Pencil, Blending Brushes, Glue Dots, Charm, Brads, Thread, Ice Stickles
 

Friday, August 16, 2024

The Dragon And The Phoenix

Hello and welcome.  To say the last couple weeks has been trying and stressful, would be an understatement.  Although I know my mom is in Heaven now, and no longer in pain, my migraine has only gotten worse and helping my brain stay foggy.  Now, for some good news ---- I've been added to the Conjurer of Dreams 2024-2025 design team!!  Here are my first projects as part of the DT.

First up is a book lovers card made using Magical Library and Fantasy Book Stack.  I started out by combining the dragon and library background before printing the combined image out on Neenah white card stock before layering and adding some vintage brads.  For the card base, I printed another background from the Magical Library, lightly sanded the edges before adding to a matching blue card base.  Taking the layered dragon image panel, I popped it up using pop dots before adding a vintage clock face from my stash along with a couple of vintage copper beads.
 
Challenges entered:
 
 
Stamps: Conjurer of Dreams
Ink: None
Card Stock: Neenah; Recollections
Accessories: Computer, Printer, Brads, Bling, Clock Face, Glossy Accents, Glue, Pop Dots, Sanding Block
 
My second card is using the Phoenix freebie for this month in the Conjurer of Dreams Inspiration Facebook group.  After combining the image, and saying, in Photoshop, I printed it out onto Neenah white card stock before layering and adding some orange brads from my stash.  Setting the layered image aside, I printed out a digital page from the Island Girl designer papers from Gecko Galz then adhered it to an orange card base.  Taking my layered phoenix, I added that to the card using pop dots before adding some yellow/orange organdy ribbon I've had in my stash for years.  The final touches were silk sunflowers with a bling center, diamond ice stickles highlighting the flames/stars and a gold star clip I've had for years and never used.

I'm really happy with how these both turned out.

Challenges entered:
 
 
Triple B Challenge
 
Thanks for stopping by today.  Have a great day.
 
Stamps: Conjurer of Dreams
Ink: None
Card Stock: Neenah; Stampin Up
Accessories: Computer, Printer, Pop Dots, Brads, Bling, Silk Flowers, Ribbon, Ice Stickles, Clip

Monday, August 12, 2024

PIP Challenge 2432

Please note, I will be taking some time off following the death of my mom.
 
 
Sponsored by 


Hello and welcome.  Today begins a new challenge over at Pammie's Inky Pinkies and this week we're being sponsored by Penguin Palace.  I would like to thank them for their sponsorship and for providing images for the design team to use.  My card today is featuring the Garden Fairy digital stamp and let me say this is one adorable stamp.  I see so many uses for it.

After I had printed the image on Neenah white card stock, I colored it using Castle Arts colored pencils along with a blending pencil before layering and adding brads.  Taking my Tim Holtz tumbled glass distress ink and a blending brush, I lightly tippled the ink around the colored images before adhering it to a dry embossed eggplant card base.  I then dug out my long retired Stampin Up Wonderful Words stamp set, inked the "Celebrate" using memento tuxedo black ink and stamped it onto a white Neenah scrap before layering and adding some faux brads.  I then stippled Tim Holtz dusty concord distress ink around the edges of the card.  Taking my blending brush, I stippled the leftover ink around the edges of the saying.  My final touch was adding some Meraki Sparkle Green Illusion bling around the colored image panel.  

Challenges entered:

Park Hopping My Happy Place Aug 2024 - Anything Goes Theme Park Related (inspired by Tinker Bell at all Disney theme parks)
Penguin Palace Challenge #40 - Rainbow (used pink, blue for the sky, purple, green, yellow) 


Thanks for stopping by today.  Have a great day and don't forget to join us this week at Pammie's Inky Pinkies.

Stamps: Penguin Palace; Stampin Up
Ink: Memento Tuxedo Black; Tim Holtz Tumbled Glass, Dusty Concord
Card Stock: Neenah; Stampin Up
Accessories: Big Shot, Cuttlebug Birthday Embossing Folder, Blending Brushes, Castle Arts Pencils, Blending Pencil, Bling, Glue, Small Hole Punch