Wednesday, September 25, 2013

Gift/Treat Bags - Mark's Finest Papers Halloween Harvest Hop Day 3


Welcome to the Mark’s Finest Papers a Heinrich Co. Halloween/Harvest Hop. We have some great tutorials for you to make some fun and easy projects for this Halloween/Harvest Season. We will be giving away two stamps sets during this hop, so two lucky people will go home with both of these fabulous stamp sets. Be sure to comment on all the designers’ blogs. Our hop will run from September 24th-27th. Our two winners will be announced on September 28th. 


September 24th - Treat Holders

September 25th - Polished Stone

September 26th - Treat Bags

September 27th - Holiday Table Setting


All our tutorials along with many more are available on MFP SpeedyTV.  The company blog has direct links to the tutorials! http://marksfinestpapers.blogspot.com


Be sure to check out all of our designers who participated in our hop. The more you comment the more chances you have to win one of these great stamp sets.


Thanks for stopping by! We hope we were able to inspire you with ideas for your Halloween/Harvest season.

I have two projects to share with you today - one for traditional Halloween gift giving and one for birthday's.  You can find the tutorial here on SpeedyTV for creating your own Halloween/Harvest treat gift bags.

My first project is for traditional Halloween gift giving and was made by stamping my ghost from What A Scream in memento black onto white card stock before coloring with a prismacolor marker.  Once the coloring was finished, it was set aside to be cut out and adhered later.  Then I stamped the candy corn background on BOTH the orange and black layers (in matching ink) before over stamping the saying in memento black, filled my bag with candy and adhered the bag topper by stapling it together.  Then I took the cut out ghost and adhered it to the candy filled bag using glue dots.

Now if you don't want to give out candy due to food allergies, or personal preference, another option is to hit the $1 store or dollar bins and fill a gift bag with one of those treasures like this candle from Michael's. 

My next project I made as part of a birthday present using my step-sister's birthday as inspiration.  Since Darla's birthday is actually on Halloween, and she doesn't celebrate it, I needed something fitting more of a fall theme.

After stamping my main images from Autumn Splendor in memento tuxedo black onto white card stock and coloring with prismacolor markers, I cut out those images and set them aside to add later once my gift bag was assembled.  Then I stamped both layers of the bag topper in matching ink before filling my bag and adhering the topper with a stapler.  Taking the cut out images, I then adhered those to the stapled topper using glue dots.  Here's a close up of the gift bag. 


Since I had already made my step-sister's birthday card, it was just time to add it to the ensemble.  Here's the blog post and instructions on making the matching birthday card since I used ten (10) different sets to make it.

Thanks for stopping by today.  Have a great day and don't forget to stop by the rest of the design team blogs to leave some love for a chance to win this week's featured sets.


Stamps:  MFP What A ScreamTree Selections Mini, Tree Greetings, Scenic Selections, Birthday Mini, Halloween Selections Mini, Celebrate Mini (birthday card inside)
Ink: Memento Tuxedo Black, Stampin Up! Pumpkin Pie, Always Artichoke, Basic Grey, Burnt Umber
Card Stock: MFP White, Stampin Up!
Accessories: Prismacolor Markers, Stipple Brushes, Dimensionals, Cellophane Bags, Candy, Coffee & Creamer Singles, Stapler, Staples, Glue Dots

Harvest/Halloween Treat Bag Tutorial


Harvest/Halloween Treat Bag


Stamps: All Mark's Finest Papers, a Heinrich Company
Autumn Splendor
What A Scream
Celebrate Mini (inside card)
Scenic Selections
Tree Greetings
Tree Selections
Halloween Selections Mini

Birthday Mini 

Supplies:
Cellophane Bags
Ink
Card Stock
Stipple Brush

When fall comes around everyone usually starts getting excited for the upcoming holidays, so why not turn the fall season into its own holiday by creating little treat bags for Halloween (class parties or trick/treat), or if you don't celebrate Halloween, to celebrate the fall Harvest season.  All you need is a clear cellophane bag, card stock, stamps, and something to fill your bag with. 


With recycling, or upcycling, being all the rage now, I've even re-used the clear cellophane bags my stamp sets have come in and have cut off the section of the bag that allows the bag to hang.

Once you have your supplies gathered, assembly is easy peasy.  For the sake of this tutorial, I will be showing how to make a Halloween treat bag, then showing a completed project for those that do not celebrate Halloween so the tutorial can be adapted for churches, school parties (mindful of food allergies), birthdays, etc.

1.  Stamp desired image onto white card stock in non water based black ink (memento, pallet noir, etc), color with markers or pencils then set aside.


2.  Take desired size bag and measure to create a folded bag topper.  Make sure to flip your bag over to mark where you want the topper to end on the back side. and give yourself 1/4 inch for folding in the middle.


3. Trim card stock to desired size.


4. Hold down cut card stock on top of bag and measure 1/4 inch on each side of bag for decorative overage.


5. Lay next layer of card stock underneath trimmed first layer and trim down to size.


6. Now stamp your background, tone on tone, onto both layers of card stock.  I even stamp the black layer, since the entire project  looks more complete when finished in my opinion.


7. Adhere both layers, and score where you want your fold to be.  Make sure to score on both sides of the layered bag topper.


8. This is what your finished topper should look like.


9. Fill your treat bag, and then using double sided tape (I prefer scotch since it holds better) adhere the topper to your treat bag.


10. Now take a stapler and staple the outer edges together to make sure no small pieces fall out.  Example: Skittles, M&M's, crumbs, etc.


11.  Take the colored image you sat aside and cut it out.


12. Using glue dots, adhere the cut out image to the bag topper.  It's ok if part of the image touches the filled bag as long as glue dots are holding that part down as well.


13. Here is our completed Halloween treat bag.


For those that do not celebrate Halloween, here's a sample of another option.  My step-sister doesn't celebrate Halloween, however, her birthday IS on Halloween itself, so I've combined Fall, Harvest, Halloween and Birthday sets to create a treat bag (filled with coffee/creamer samples) and matching card for her birthday.  I've included close-ups of the treat bag and card.


I hope you enjoyed the tutorial.  If you make something using it, leave me a post with a link in the comment section so I can check your project out.  Thanks.

Thursday, September 19, 2013

Spooky Fishing In The Woods


Hello and welcome.  Today I am sharing another card I've made for this month's Craft A Scene challenge.

I started out by stamping my foreground images in memento tuxedo black ink, then masking the images and repeatedly stamping the mountains in the background.  Once I was satisfied with the coverage, I pulled out my koh-i-noor pencils and began coloring everything blending with an alcohol marker as I went along.  Once my main image panel was stamped and colored, I decided to stamp one additional tree and cat image, color, then cut out to pop up on pop dots later.  Once I had added some vintage looking brads, I pulled out a Making Memories moon brad from my stash and added it to the upper left corner before adding ice stickles to the lake and then my cut out images.

Thanks for stopping by today.  Have a great day.

Stamps: MFP On The Fly, Halloween Mini Selections, Tree Selections, Mountain Selections Mini
Ink: Memento Tuxedo Black, Tim Holtz Chipped Sapphire, Stampin Up! Garden Green
Card Stock: Stampin Up!
Accessories: Koh-I-Noor Pencils, Blender Marker, Brads, Making Memories Moon Brad, Stipple Brushes, Ice Stickles, Pop Dots

Wednesday, September 18, 2013

It's Spooktacular


Hello and welcome.  I'm trying to get back into my scenic stamping again, or stamping in general, since I've had some major issues the last couple of months with my migraines.  This month's Craft A Scene challenge seemed like a great place to start getting "my feet wet again".

I started out by stamping my main image from Big City by Mark's Finest Papers, a Heinrich Company in memento tuxedo black onto white card stock before stamping the cat and bat from the Broom Rides Mini set twice (once onto scrap white card stock to cut out later).  Once my main image panel was stamped, I punched a small circle from a post it note and adhered it over the cat and then started stippling various shades of Tim Holtz distress inks to make a sunset with the moon over my city.  Then taking the cut out images, I popped them up on micro pop dots to make the foreground images more pronounced before adding some silver bat brads and adhering with glue dots.  After stamping my saying, I added some orange gems as part of the saying to make it stand out more against the black background.

Thanks for stopping by today.  Have a great day.

Stamps: MFP Big City, Broom Rides Mini
Ink: Memento Tuxedo Black, Tim Holtz Distress Inks
Card Stock: Stampin Up!
Accessories: Stipple Brushes, Brads, Glue Dots, Gems, Micro Pop Dots, Circle Punch

It's TCP Tuesday Time!


Hello and welcome.  Today I am sharing a few cards I've made for this month's TCP Tuesday paper piecing challenge.  Although it's a very simple technique with beautiful results, it's also one I don't do very often.

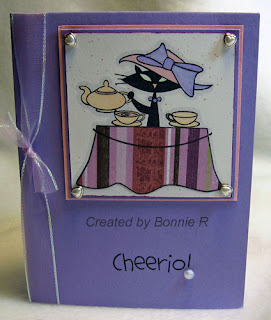
My first card uses one of my favorite TCP sets, Coffee, Tea, Meow along with some scrap designer paper for the tablecloth, heart pearl brads, ribbon, and a pearl dew drop.  Miss Sprinkle is also colored using prismacolor markers and a blender marker.

My second card features Oh Chute on a one layer scrap card, scrap designer paper for the parachute, a die cut cloud border I cut apart, popped up, then stippled ink on and some hand drawn birds.  I also stippled some of my own clouds using a scalloped oval punch scrap along with Tim Holtz tumbled glass ink.

There's still time for you to enter into the challenge so what are you waiting for?  Thanks for stopping by today.  Have a great day.

Stamps: TCP Coffee, Tea, Meow, Oh Chute
Ink: Memento Tuxedo Black, Tim Holtz Tumbled Glass
Card Stock: Stampin Up!, Designer Paper Scraps
Accessories: Prismacolor Markers, Stipple Brush, Marvy Scallop Oval Punch, TCP Cloud Border, Dimensionals, Black Marker, Dew Drop, Glue Dots, Pearl Heart Brads, Ribbon

Thursday, September 12, 2013

Tailgate Party - Mark's Finest Papers Blog Hop Day 4


Sept. Blog Hop! 

This month's New Stamp Set Releases are

 Featured Sept 10 - Koi Fish
Featured Sept 11 - Primitive Farm
 Featured Sept 12 - What a Scream
 Featured Sept 13 - Tailgate Party

Please hop along with us! You have a chance to win one of the above stamp sets! Just comment on the following blogs (don't forget this one), each day for more chances to win! (You do NOT have to comment on all the blogs each day! The names are drawn randomly!) All four winners will be announced on Sept. 14, 2013 on the Mark's Finest Papers blog. You can go back and comment if you missed a day. (HINT: The more you comment, the more chances you have to win and comments on the MFP blog count twice!) The deadline for commenting is 10 PM EST on Friday Sept. 13, 2013.

 The special stamp set we have for you this month is:

"Holiday Tag"


 The mini stamp set we have for you this month is:

"Nature's Brushstrokes"


Here's the Design Team:

Patty
Lois
Jane C
Debbie
Pam
Pat G
Thrfity Stamper
Marilynn
Kathy
Angela
Cathy C
Toni
Sue W
Janine
An'Jenic
Kate Z
Shirley Q
Marks Finest Papers, a Heinrich Co.


Today's featured set is perfect for invitations for those backyard parties, arm chair viewing parties, scrapbooking, or encouragement for your local schools.

For my project, I went with the Keep It Simple Stamper method since my migraines were getting out of control again.  Instead of stamping my main image, I chose to use a BBQ die cut that was sent to me by a friend and paired it with the pennant banner stamp at the top of the card along with the GO TEAM saying.  After pulling each of the banners up a bit for added dimension, I stamped the football onto scrap white card stock, colored then cut it out before adhering with glue dots.  Presto!!  My card was finished.  So now I have one question for you:  Are you ready for some football??????  :)

Thanks for stopping by today.  Have a great day and don't forget to stop by the rest of the design team blogs to leave some love for a chance to win today's featured set.

Stamps: Tailgate Party
Ink: Memento Black
Card Stock: Spring Leaf, Colorbook Designer Paper
Accessories: BBQ Die Cut, Glue Dots

Wednesday, September 11, 2013

What A Scream - Mark's Finest Papers Blog Hop Day 3


Sept. Blog Hop! 

This month's New Stamp Set Releases are

 Featured Sept 10 - Koi Fish
Featured Sept 11- Primitive Farm
 Featured Sept 12 - What a Scream
 Featured Sept 13 - Tailgate Party

Please hop along with us! You have a chance to win one of the above stamp sets! Just comment on the following blogs (don't forget this one), each day for more chances to win! (You do NOT have to comment on all the blogs each day! The names are drawn randomly!) All four winners will be announced on Sept. 14, 2013 on the Mark's Finest Papers blog. You can go back and comment if you missed a day. (HINT: The more you comment, the more chances you have to win and comments on the MFP blog count twice!) The deadline for commenting is 10 PM EST on Friday Sept. 13, 2013.

 The special stamp set we have for you this month is:

"Holiday Tag"


 The mini stamp set we have for you this month is:

"Nature's Brushstrokes"


Here's the Design Team:

Patty
Lois
Jane C
Debbie
Pam
Pat G
Thrfity Stamper
Marilynn
Kathy
Angela
Cathy C
Toni
Sue W
Janine
An'Jenic
Kate Z
Shirley Q
Marks Finest Papers, a Heinrich Co.


Today's featured set can be used for many occasions besides just Halloween so I chose to go with a birthday theme for my project.  After stamping the background for my card in artichoke ink using the solo pumpkin from Autumn Splendor then sponging the same ink around the sides, I was ready for the main image panel.

I stamped the cat from What A Scream in memento black then colored with a grey prismacolor marker before stamping the bare trees from Tree Selections Mini and Tree Greetings in pallet burnt umber ink before sponging more artichoke ink along the bottom for grass and then some grey ink at the top for the sky.  I also stamped the bird trio from Scenic Selections several times in memento ink to mimic bats flying across the top before layering my image panel and adding brads.  Then I stamped the "eek" from What A Scream onto some scrap white card stock and the "you're how old" saying from the Birthday Mini underneath along with some leaves from the Halloween Selections Mini, colored and layered before popping up on pop dots in the upper left hand corner.  My final touch was to add two pumpkins from Autumn Splendor popped up on dimensionals to help frame the cat a bit more.

Thanks for stopping by today.  Have a great day and don't forget to stop by the rest of the design team blogs to leave some love for a chance to win today's featured set.

Stamps: What A Scream, Autumn Splendor, Tree Selections Mini, Tree Greetings, Scenic Selections, Birthday Mini, Halloween Selections Mini, Celebrate Mini (inside)
Ink: Memento Black, Stampin Up! Artichoke, Going Grey, Pallet Burnt Umber
Accessories: Prismacolor Markers, Stipple Brush, Sponge, Pop Dots, Dimensionals, Brads
Card Stock: White, Stampin Up! Artichoke, Pumpkin, Black


Tuesday, September 10, 2013

Primitive Farm - Mark's Finest Papers Blog Hop Day 2


Sept. Blog Hop! 

This month's New Stamp Set Releases are

 Featured Sept 10 - Koi Fish
Featured Sept 11 - Primitive Farm
 Featured Sept 12 - What a Scream
 Featured Sept 13 - Tailgate Party

Please hop along with us! You have a chance to win one of the above stamp sets! Just comment on the following blogs (don't forget this one), each day for more chances to win! (You do NOT have to comment on all the blogs each day! The names are drawn randomly!) All four winners will be announced on Sept. 14, 2013 on the Mark's Finest Papers blog. You can go back and comment if you missed a day. (HINT: The more you comment, the more chances you have to win and comments on the MFP blog count twice!) The deadline for commenting is 10 PM EST on Friday Sept. 13, 2013.

 The special stamp set we have for you this month is:

"Holiday Tag"


 The mini stamp set we have for you this month is:

"Nature's Brushstrokes"


For today's featured set, I decided to make a home decor item and framed my project using a shadow box frame I found at the dollar store.

After sponging my hills using some artichoke ink and torn copy paper, I stamped my base images in memento black onto corn husk card stock before adding the trees ink'd with markers.  Once I had my base images done, I stamped two additional layers of images onto scrap white card stock then colored all of the images with koh-i-noor pencils and a blender marker.  After my coloring was finished, I pulled out my Scenic Selections set then stamped the bird and grass before cutting out the additional images and popping them up.  For the final touches, I die cut some vines from scrap card stock and punched flowers using a Martha Stewart punch, adhered using micro glue dots, then pinched the sides up before adding gold ice stickles to the center of the flowers.

Thanks for stopping by today.  Have a great day and don't forget to stop by the rest of the design team blogs for a chance to win today's featured set.

Stamps: MFP Primitive Farm, Scenic Selections
Ink: Memento Tuxedo Black, Stampin Up! Artichoke, Tim Holtz Tumbled Glass
Card Stock: Corn Husk, White
Accessories: Koh-I-Noor Pencils, Blender Marker, Dimensionals, Micro Glue Dots, Sponge, Frame, Ice Stickles, Vine Die, Stipple Brush

Monday, September 9, 2013

Koi Fish - Mark's Finest Papers Blog Hop Day 1


Sept. Blog Hop! 

This month's New Stamp Set Releases are

 Featured Sept 10 - Koi Fish
Featured Sept 11 - Primitive Farm
 Featured Sept 12 - What a Scream
 Featured Sept 13 - Tailgate Party

Please hop along with us! You have a chance to win one of the above stamp sets! Just comment on the following blogs (don't forget this one), each day for more chances to win! (You do NOT have to comment on all the blogs each day! The names are drawn randomly!) All four winners will be announced on Sept. 14, 2013 on the Mark's Finest Papers blog. You can go back and comment if you missed a day. (HINT: The more you comment, the more chances you have to win and comments on the MFP blog count twice!) The deadline for commenting is 10 PM EST on Friday Sept. 13, 2013.

 The special stamp set we have for you this month is:

"Holiday Tag"


 The mini stamp set we have for you this month is:

"Nature's Brushstrokes"


Here's the Design Team:
Patty
Lois
Jane C
Debbie
Pam
Pat G
Thrfity Stamper
Marilynn
Kathy
Angela
Cathy C
Toni
Sue W
Janine
An'Jenic
Kate Z
Shirley Q
Marks Finest Papers, a Heinrich Co.


Since it's almost officially the fall season, I'm officially starting to make my Christmas presents and I have one to share with you using today's featured set.  My husband loves to use his woodworking tools even though he's disabled, so here's a nifty way to get your hubby involved in stamping too plus save some money at the same time.

Taking a candle on clearance at Michael's, or even from the dollar store, my husband hollowed out the center so I could add a battery operated votive to make sure the candle didn't melt when lit.  Then I measured how much vellum I'd need to wrap around the candle, stamped on one side in memento black before coloring the back side using Rose Art colored pencils, then wrapping the vellum around the candle. For the packaging, I pulled out a white take out box from Michael's, stipple Tim Holtz tumbled glass distress ink around the edges before stamping images onto white scrap card stock then coloring using prismacolor markers.  Once my coloring was finished, I cut out the additional images and adhered them to the take out box using glue dots.  Easy peasy!!  Here's a close up of the finished candle.

I'll be making a tutorial on how to do this at a later date, possibly around October 1st.  Unfortunately, my migraines are not cooperating with me to write one right now.  So watch for it.

Thanks for stopping by today.  Have a great day and don't forget to stop by the rest of the design team blogs to leave some love for a chance to win today's featured set.

Stamps: Koi Fish, Dragonflies
Ink: Memento Tuxedo Black, Tim Holtz Tumbled Glass
Accessories: Stipple Brush, Prismacolor Markers, Candle, Take Out Box, Rose Art Colored Pencils, Ice Stickles, Googlie Eyes, Glue Dots
Card Stock: Vellum