Wednesday, March 30, 2011

Thinking Of Tea - MTME Pretty Patterns Sketch 03


Hi all!!  It's Thursday, and that means another My Time Made Easy Pretty Patterns Sketch Challenge.  I've enjoyed participating in the challenges these last couple of weeks, and inking stamps that were starting to collect some dust.  I also have some exciting news to share with you.  I am now a part of the Pretty Patterns Sketch Challenge Team!!  Somebody pinch me!!  I am still doing the happy dance over here. Dancing Pictures, Images and Photos

For this week's card, I pulled out a set that had not even seen ink yet, however is dear to my heart, called A Spot Of Tea.  Since I'm a heavy tea drinker, when this set was released I just had to have it!  I started off by printing one of the digital designer papers from the A Loving Heart collection.  I then allowed the colors of the digital paper to guide my color selection. 

After stamping my teacup images in memento tuxedo black ink onto white paper, I then used some PTI color spots for the roses and leaves before taking my prismacolor markers out and coloring the tags and steam.  After all of the coloring was done, I cut out one teacup, tag & steam to pop up with various sizes of dimensionals and pop dots. There is actually a lot of dimension on this card.  Here's a close up:

As each colored image was cut out, or layered, I sponged Stampin Up!'s Pretty In Pink dye ink around the edges before finally sponging the edge of the card itself.  For the final touches, I used some Stampin Up! bold bright brads and a Martha Stewart pre-made bow with some glue dots. 

Thanks for stopping by today.  If you haven't participated in any of the new My Time Made Easy challenges, you really should.  They're a lot of fun!


Stamps: My Time Made Easy A Spot Of Tea
Ink: Memento Tuxedo Black, Stampin Up! Pretty In Pink, PTI New Leaf, Berry Sorbet
Card Stock: White, Stampin Up! Pretty In Pink, Green Galore, My Time Made Easy A Loving Heart Digital Designer Paper
Accessories: Prismacolor Markers, Sponge, Martha Stewart Bow, Glue Dots, Computer, Printer, Pop Dots, Dimensionals, Stampin Up! Brads

Tuesday, March 29, 2011

Welcome To The Neighborhood


Hello and happy Tuesday.  While playing around this week with some of my Taylored Expressions sets, I decided to finally ink up Cozy Cottages

Once I had stamped all of the cottages I wanted and colored them with prismacolor markers, I cut each one out to pop up some while leaving others "flat on the card".  I had decided to use some MFT cloud digital paper as a background to give a more realistic look.  After pulling out some Jolee's die cuts, the Whimsy Tree Die and a MFT cloud die-namic, I was ready to assemble everything.

Once I had popped up two of the cottages, I realized I needed one more so I stamped the birdhouse, colored it then added it to the card.  The grass and flowers are Jolee's die cuts while the frog is a dimensional sticker from Michaels.

Thanks for stopping by. 


Stamps: Taylored Expressions Cozy Cottages
Card Stock: White, Stampin Up! Green Galore, MFT Digital Cloud Designer Paper
Ink: Memento Tuxedo Black
Accessories: Prismacolor Markers, TE Whimsy Tree Die, MFT Cloud Die-Namic, Dimensionals, Jolee's Die Cuts, Frog Sticker

Monday, March 28, 2011

Teapot House - MMTPT139


Happy Monday!  It's the beginning of a new week.  First and foremost, let me apologize for my card being assembled crookedly.  I'm still dealing with a freakin migraine that doesn't want to go away.  For this week's Teapot Tuesday challenge, we are to make "girly" or feminine cards with ribbon some for a fellow SCSer who lost all of her stamping stuff in a flood. 

With the inspiration photo being pink & white teapots, I pulled out a retired Cornish Heritage Farms Mushroom Lane teapot house I've had for a while.  After stamping it up in memento tuxedo black ink then coloring with prismacolor markers, I lightly stippled some Stampin Up! bashful blue ink around the edges before layering.  For the card base itself, I pulled out a retired Stampin Up! wheel that I've had for years, and inked it with pixie pink before rolling diagonally across the card base. 

Once the card was done, I added a MFT jumbo scallop die-namic die cut that was in my stash before popping up my image panel.  Once that was done, I added a couple of primas with bling centers and some ice stickles to the bugs & flowers to finish everything off.

Thanks for stopping by today.  Have a great week.


Stamps: Cornish Heritage Farms Mushroom Lane Teapot, Stampin Up! Bugs & Blossoms Wheel
Ink: Memento Tuxedo Black, Stampin Up! Bashful Blue, Pixie Pink
Card Stock: White, Stampin Up! Pixie Pink, Lovely Liliac, Green Galore, Pumpkin Pie
Accessories: Prismacolor Markers, Ice Stickles, Primas, Glue Dots, Dimenionals, Brads, Ribbon Bow, MFT Jumbo Scallop Die-Namic, Stampendous Bling Stickers

Sunday, March 27, 2011

Creativitea And A Sketch Challenge


Third post for today.  If you're looking for my Christmas Card Challenge or My Time Made Easy challenge, please scroll down.

I've finally gotten a chance to participate in the Taylored Expressions Sketch Challenge.  Since I had to stamp and assemble my card with a migraine, I chose soft colors to work with.  For the challenge, I pulled out my Creativitea stamp set, and then made myself a cup of tea to stamp with. I stamped the images in memento tuxedo black ink before coloring with prismacolor markers.  After coloring my images, I pulled out my Stampin Up! 1 1/4 circle punch, punched out the images, and then sponged regal rose ink around the edges. 

Since the sketch has a bow in it, and I'm horrible at making bows, I stamped an extra flower image  and layered it over stamped regal rose card stock to replace the bow/ribbon in the sketch.  I then decided to pull out my Stampin Up! small flower trio punch to create some small flowers out of scrap Basic Grey Euphoria designer paper then adding some glitter stickers to the centers.  For the final touch, I added some gold ice stickles to the centers of my stamped flower & teacups.

Thanks for stopping by.  Have a great day.


Stamps: Taylored Expressions Creativitea
Ink: Memento Tuxedo Black, Stampin Up! Regal Rose
Card Stock: White, Stampin Up! Regal Rose, Pretty In Pink, Pink Pirouette, Basic Grey Euphoria Designer Paper
Accessories: Prismacolor Markers, Dimensionals, 1 1/4 Circle Punch, Flower Trio Punch, Glue Dots, Sponge, Stampendous Bling Stickers, Gold Ice Stickles

Friendship Flowers


Second post for me today.  If you're looking for my February Christmas Card Challenge, please scroll down one post.

For this week's My Time Made Easy Pretty Pattern challenge, I decided to go with a spring theme to match the Stamp Something Spring Challenge and pulled out my Bold Botanicals set and stamped the flowers in memento tuxedo black ink before coloring with prismacolor markers.  I had allowed my color design to be decided by some Basic Grey Infuse designer paper I had planned on using as a background.  Once everything was stamped and colored, I layered the flowers on Stampin Up! basic black card stock to help make the images pop a bit more and added some baby brads.  It was at this point I decided to be a bit of a rebel and omit one layer from the sketch because it wouldn't work with what I had planned.  Since I'm too lazy to tie a bow (yes, I admit it), I cut a piece of real red scrap card stock to act as a border under the images, stamping it in memento ladybug ink, before pulling out a pre-made rose ribbon and adding it with glue dots. 

Since the card still seemed a bit plain, I then added some red gem stickers to the flower centers and then a vintage brad saying to the left hand side of the card to fill in all of the empty space there since I changed my card around a couple of times while assembling it.  Here's a close up of the details.

If you haven't tried any of the My Time Made Easy challenges, you really should since they're a lot of fun.  Thanks for stopping by, have a great day.


Stamps: My Time Made Easy Bold Botanicals
Ink: Memento Tuxedo Black, Memento Ladybug Red
Card Stock: Stampin Up! Real Red, Basic Black, White, Basic Grey Infuse Designer Paper
Accessories: Prismacolor Markers, Making Memories Baby Brads, Vintage Brad Sentiment, Silk Ribbon Rose Bow, Glue Dots

Mince Pie Oops! March CCC2011


I found this cute free digital image at Birds Cards and just had to use it for this month's cards for the Christmas Card Challenge at Splitcoaststampers

Once I downloaded, and printed the image, I colored it with prismacolor markers before stippling Stampin Up! night of navy ink around the edges for a "night sky".  For the card itself, I pulled out a Tim Holtz embossing folder and embossed just the front half of the card before beginning my layering and adding some ribbon.  I had wanted to keep things simple not only for mass production, but because the image is just too darn cute!  I definitely wanted Santa's oops to be showcased.

Thanks for stopping by today.  Have a great day.


Stamps:  Birds Cards Digital Image
Ink: Stampin Up! Night Of Navy
Card Stock: White, Stampin Up! Riding Hood Red, Wild Wasabi, Real Red
Accessories: Prismacolor Markers, Stipple Brush, Tim Holtz Embossing Folder, Big Shot, Brads, Ribbon

Thursday, March 24, 2011

Little Sailor Days


Remember, long ago, kids dressed up in little sailor outfits?  I don't remember if I did this to my kids or not.  Oh, that's making me old!!  I found this really cool free digital image at Digital Two For Tuesday a while back.  I finally got around to coloring and making a card with the image. 

After printing the image on white card stock, I let the ink dry for 20 minutes or so, then colored with prismacolor markers before stippling Stampin Up! creamy caramel ink around the edges.  (Now why did Stampin Up! retire this color?  Personally, I use it all of the time for beach, lighthouse, ocean, and especially vintage cards.  Now I have to find a new color to use - what a drag!)  However, I digress.

Once my image was layered, I die cut some wave borders in navy card stock using MFT's Wave Die-Namic.  After adding the wave borders over some Costco designer paper, I popped up my "kids" over the waves using dimensionals.  Here, I decided to be a bit different.  Instead of tying my twine horizontally like normal, I cut a small slit in the top of the card and threaded my twine through the top before tying it into a knot.  After adding a punched starfish to the center of the twine knot, I finished the card off by stippling caramel ink around the edges of the card to age it a bit more.

Thanks for stopping by today.  Have a great day!

Stamps: Digital Image Digital Two For Tuesday
Ink: Stampin Up! Creamy Caramel
Card Stock: White, Stampin Up! Night Of Navy, Creamy Caramel, Kraft Scrap, Costco Designer Paper
Accessories: Prismacolor Markers, Computer, Printer, Twine, Dimensionals, Brads, Stipple Brush, Martha Stewart Starfish Punch, Glue Dot

Wednesday, March 23, 2011

March Blast From The Past!!!


Hi there.  Can you believe it's March already?  Wow!!  Where has this year gone to already?  It's that time of the month again - Taylored Expressions Blast From The Past Blog hop!!  This month our challenge is all about spring.  My idea of spring is blossoms on the trees with new green leaves.  So with that in mind, along with another migraine, I pulled out my Branching Out and Branching Out Coordinates sets.

I started by stamping my images on white card stock in memento tuxedo black ink and then coloring with prismacolor markers.  Once my animal images & birdhouse were colored, I set them aside for cutting out and popping up later.  I then ran some Stampin Up! pacific pointe and green galore card stock through my big shot with a leaves cuttlebug embossing folder.  Once my dry embossing was done, with the layers added, I took my main image, layered it then stippled some Stampin Up! bashful blue ink around the edges for the sky. 

I then added a butterfly brad I had found at Michael's in the top left corner, while adding some Making Memories white baby brads in the remaining corners.  After cutting out my extra images and popping them up on  mini pop dots, I then added some small green primas to look like blossoms with a Stampendous bling sticker center.  Another prima flower with a brad center, and a Martha Stewart green grossgrain bow finished the card off.

Not bad, even on the freakin migraine meds again.  Now make sure you stop by the rest of the hop participants (listed below) for some more eye candy and please leave some love on their blogs as well.


Have a great day!!

Stamps: Taylored Expressions Branching Out & Branching Out Coordinates
Ink: Memento Tuxedo Black, Stampin Up! Bashful Blue
Card Stock: White, Stamping Up! Pacific Pointe, Green Galore, Kraft
Accessories: Prismacolor Markers, Stipple Brush, Martha Stewart Ribbon Bow, Glue Dots, Pop Dots, Primas, Stampendous Bling Stickers, Making Memories Baby Brads, Michael's Recollections Butterfly Brad, Big Shot, Cuttlebug Leaves Embossing Folder

Tuesday, March 22, 2011

Good Fortune & A My Time Made Easy Sketch


Hello everyone!  Second post for me today.  To see my Teapot Tuesday card, please scroll down one post.

Have you heard the great news!?  My Time Made Easy has a new blog AND new challenges!!  Yahoo!  For the first Pretty Patterns (sketch) challenge, I decided to be a rebel and flipped the sketch.  Pulling out my So Fortunate set, I stamped my images in memento tuxedo black ink on white card stock; making sure to stamp the girl twice to pop up later.  After coloring everything with prismacolor markers, I stippled some Stampin Up! bashful blue ink around the edges of the main image panel before popping up on dimensionals as well as the saying.  Since I was not real sure about what to do with the bows in the sketch, I just decided to pull out a couple of pre-made ribbon bows from Michael's and added those to the top.

Here's a close up of all of the dimension. 

Thanks for stopping by today.  Have a great week!


Stamps: My Time Made Easy So Fortunate
Ink: Memento Tuxedo Black, Stampin Up! Bashful Blue, Certainly Celery, Pretty In Pink, Memento Versamark Tea Leaves, Memento Versamark Pink
Card Stock: White, Stampin Up! Pretty In Pink, Blush Blossom, Bashful Blue, Certainly Celery Scraps, My Time Made Easy Fun & Fortune Digital Paper
Accessories: Prismacolor Markers, Stipple Brushes, Dimensionals, Making Memories White Baby Brads, Ribbon Bows, Glue Dots

What A Hot Ride!!


Hello again!  This week's Teapot Challenge is to make a masculine card (cars, trucks, cooks, sports, etc) for our Destination Station recipient.  For that, I decided to pull out my long retired, but well loved Stampin Up! set Classic Pickups.

I started out by stamping the pickup on white card stock in memento tuxedo black ink and coloring with prismacolor markers.  Since I was making the flames stand out a bit, I decided to sponge Stampin Up! summer sun ink around the edges before layering.  For the background, I pulled out the matching retired tire track wheel and inked it in Stampin Up! real red, only orange, & summer sun dye inks for the corresponding layers.  After adding some Making Memories white baby brads, I pulled out some Colorbook metal sticker dots to fill in some of the extra space on the card front. 

If you haven't joined in on the Teapot Tuesday challenges, you really should try sometime.  They're a lot of fun.  Thanks for stopping by today.  Have a great day!!


Stamps: Stampin Up! Classic Pickups, Tire Track Wheel, Close To My Heart Saying
Ink: Stampin Up! Real Red, Only Orange, Summer Sun, Memento Tuxedo Black
Card Stock: White, Stampin Up! Real Red, Only Orange, Yoyo Yellow
Accessories: Prismacolor Markers, Sponge, Colorbook Metal Sticker Dots, Making Memories White Baby Brads

Thursday, March 17, 2011

Sing Praises To God


Hello again.  Today I'm sharing the last of my VSN weekend stamping session cards.  I had found this digital image from DeeDee's Digis and thought it would be great for the Read The Music challenge - using sheet music on a card.

After printing off my digital sheet music and the images, I colored the image with koh-i-noor pencils and a blender marker before lightly stippling Stampin Up! basic black ink around the edges.  Taking a 1/4 inch circle punch, I punched out a "moon" from some scrap paper and added glitter to the edges so it would look like the coyote was howling at the moon from the desert. 

Once I started my layering, I decided to keep everything else in a simple black/white theme, including the primas, brads, and ribbon.  Not bad, huh?

Thanks for stopping by today.  The week is almost over folks.


Stamps: Digital Image From DeeDee's Digis
Card Stock: Black, White, Digital Sheet Music
Ink: Stampin Up! Basic Black
Accessories: Koh-I-Noor Pencils, Prismacolor Blender Marker, Primas, Making Memories Baby Brads, Circle Punch, Glitter, Ribbon

Wednesday, March 16, 2011

Pretty As A Peacock


Happy Wednesday!!!  The week is half over already.  Now where is this month going??  February just seemed to fly by and now March is doing the same thing. 

I just love this image from The Stamping Bug.  Ironically, I found it during a VSN stamping weekend a few years back.  Another stamper had used the image and I just had to know who made it and where to get it.  Ever have one of those moments?  I haven't regretted it since.

I inked up an long retired Stampin Up! background first in turquoise ink and stamped that on the card.  Then, inking up my peacock, I started in on coloring it with my prismacolor markers.  I know most people use copics now, but I'm in love with my prismacolor's.  Once the coloring was done, I stippled some turquoise ink around the edges before layering and adding matching brads.  Once that was done, I popped it up over some Stampin Up! apricot ribbon and added a silver paper clip saying & bling to the feathers to finish everything off.

Thanks for stopping by today.  Have a great rest of the week.


Stamps: Stampin Up! Filigree (retired), The Stamping Bug (peacock)
Ink: Memento Tuxedo Black, Stampin Up! Tempting Turquoise
Card Stock: White, Stampin Up! Tempting Turquoise, Apricot Appeal
Accessories: Prismacolor Markers, Stipple Brush, Ribbon, Clip, Brads, Dimensionals

Tuesday, March 15, 2011

A Lighthouse By The Sea


Hello again.  I have another VSN card for you today using one of my favorite GinaK Designs sets - Guiding Light.  Since I love lighthouses, when this set came out a year ago, it was a no brainer to buy it.  Too bad it hasn't seen ink much in the last year because the set makes some really pretty cards.

For this VSN challenge, I stamped my lighthouse scene twice in memento tuxedo black onto white card stock before coloring with prismacolor markers.  After the coloring was done, I cut one lighthouse out to pop up later.  Once my layering was done, I popped up the second lighthouse using dimensionals, added some vintage brads and then just a bit of waterfall ice stickles for the background waves.

Turning my attention to the card, I then stamped the anchor chain in Tim Holtz tea stain ink onto a MFT kraft scalloped card from one of the monthly kits a year ago.  Once that was done, I then stippled Stampin Up! creamy caramel ink around the edges of the card before die cutting waves using Stampin Up! creamy caramel and soft sky card stocks with a MFT Die-Namic.  After my waves were die cut, I then lightly stippled creamy caramel ink over, and around the edges of them, to highlight a bit more against the kraft card.  The final touch was some ribbon I had bought from the Michael's dollar bin over a year ago and just hadn't used yet.  Don't you just love when something you bought a long time ago turns out fitting in perfectly?

Thanks for stopping by today.  Tomorrow I have another VSN card to share with you as well.


Stamps: GinaK Guilding Light
Ink: Memento Tuxedo Black, Tim Holtz Tea Stain
Card Stock: White, MFT Kraft Scalloped Card, Stampin Up! Soft Sky, Creamy Caramel
Accessories: Prismacolor Markers, Stipple Brush, MFT Die-Namic, Dimensionals, Vintage Brads, Ribbon, Glue Dot

Monday, March 14, 2011

A VSN Little Red Dress


Today I have another card to share with you from VSN a couple of weeks ago, however, using the kissing technique this time.  No, you don't kiss your stamps, the stamps "kiss" each other.  In other words, ink two stamps up in two different colors and then touch (kiss) them together to transfer the images.  Easy!

I started out by dry embossing some Stampin Up! real red card stock by running it through my Big Shot with a cuttlebug heart embossing folder.  Then I inked my dress stamp twice with memento ladybug red ink and then "kissed" the dress twice with a definition background inked in black.  Once I stamped the "kissed" dress onto white card stock, I set one aside to pop up later. 

After my dress & sentiment layers were complete, I added some silk red flowers I had found in the Walmart craft section recently.  I then cut out my "kissed" dress and popped it up on dimensionals.  Easy peasy!!!

Thanks for stopping by today.


Stamps: American Art Stamp (dress), Rubber Stampede (saying & definition background)
Card Stock: Stampin Up! Real Red, Basic Black, White
Ink: Memento Ladybug Red, Memento Tuxedo Black
Accessories: Cuttlebug Heart Embossing Folder, Big Shot, Dimensionals, Making Memories Baby Brads, Silk Roses, Glue Dots

Sunday, March 13, 2011

My First Love


First, and foremost, prayers going out to those affected by the earthquake & tsunami in Japan.  Please consider donating to the American Red Cross so they may help the victims of this disaster.

Now, I finally got a chance to participate in a VSN weekend over at Splitcoast a couple of weeks ago.  For one of the challenges, we were to stamp out our first love growing up or our kids first love.  Well, I chose my teddy bear as my first love.  Mr Bear is as old as I am and has seen me through some really tough times growing up - parent divorce, mom's bout with cancer and then losing her fight, among other things.

I stamped the bear from Taylored Expressions Beary Special set twice in memento tuxedo black ink and colored with prismacolor markers.  Once the coloring was done, I cut out one bear to pop up later on dimensionals.  Pulled out my MFT Jumbo Ric Rac Die-Namic and die cut some pink card stock then stippled it with Stampin Up! chocolate chip ink.  A large prima and glitter brad finish things off.

Thanks for stopping by today.


Stamps: Taylored Expressions Beary Special
Ink: Memento Tuxedo Black, Stampin Up! Chocolate Chip
Card Stock: White, Designer Paper, Stampin Up! Chocolate Chip, Pretty In Pink
Accessories: Prismacolor Markers, MFT Jumbo Ric Rac Die-Namic, Stipple Brush, Heart Stickers, Dimensionals, Prima, Glue Dots, Glitter Brad

Saturday, March 12, 2011

Country Girl


This is my take on last week's Musical Challenge to Barbara Mandrell's song "I was country when country wasn't cool".  I love that song especially since I grew up listening to it.  Once the challenge was announced, I had no problem picking out the stamp set I wanted to use.

After inking up my country girl & stamping her twice onto white card stock, I pulled out my prismacolor markers and got to coloring.  Once that was done, I cut out one of the images for popping up later on pop dots.  The remaining image I highlighted with a light gray marker then stippled Stampin Up! creamy caramel ink around the edges before layering. 

Pulling out some designer paper I picked up at Michael's a few years back, I added that to the main card and started layering everything.  I had a few Stampin Up! designer brads I received in a secret sister gift a while back and added those as well.  Since there were only three matching brads, I stamped the sentiment and popped it up where the fourth brad would have gone and added a couple of small primas.  I really like the way it turned out.

Thanks for stopping by today.  Have a great day.


Stamps: Rubber Romance
Card Stock: Designer Paper, White, Stampin Up! Riding Hood Red, Chocolate Chip
Ink: Memento Tuxedo Black, Stampin Up! Creamy Caramel
Accessories: Prismacolor Markers, Stampin Up! Brads, Making Memories Silver Brads, Stipple Brush, Pop Dots, Mini Pop Dots, Micro Pop Dots, Glue Dots, Primas, Ribbon

Wednesday, March 9, 2011

Sitting By The Dock


Happy Wednesday!!!  The week is half over already.  Remember that song "Sitting By The Dock Of The Bay"?  I had this going through my head the entire time I was making this card.

Today I'm sharing a card with an image from Digital Two For Tuesday that qualifies for Stamp Something's digital challenge.  After printing it off, I pulled out my koh-i-noor pencils and blender marker to color it up.  Wow!  Did it turn out better than I thought it would.  After pulling out my stash of Costco designer papers, I found an old world map to match the digital image.  Once my image was colored, I lightly stippled Stampin Up! bashful blue dye ink around the edges and to fill in the background sky.  I tried to keep the stippling as light as possible over the water so it would give the appearance of the fog rolling back out to sea.  Hopefully I achieved that.  Some Stampin Up! kraft thread, vintage looking brads and a navy button from Papertrey Ink finish the card off.


Stamps: Digital Two For Tuesday Digital Image
Ink: Stampin Up! Bashful Blue
Card Stock: White, Stampin Up! Night Of Navy, Costco Designer Paper
Accessories: Koh-I-Noor Pencils, Prismacolor Blender Marker, Stampin Up! Kraft Thread, Vintage Brads, Papertrey Ink Navy Button, Pop Up Glue Dot

Tuesday, March 8, 2011

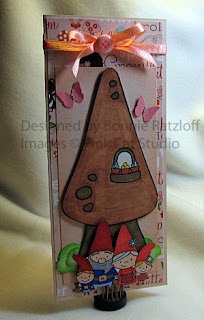
There's No Place Like Gnome


Happy Tuesday everyone!!!  Today I'm sharing a card I made using Pink Cat Studio's adorable digital gnome images.  After printing off the images and coloring them with prismacolor markers, I cut out the mushroom house and the gnome family pairing them up with some cute Imaginesce designer paper. 


I had wanted some bushes also for the house so I pulled out my MFT cloud trio die-namics and die cut some Stampin Up! gable green card stock, then sponged those with green galore before adding them behind the popped up mushroom house.  I then took the gnome family and popped them up on Michael's pop dots so they would add some more dimension to the card.  Here's a close up of the cards dimension.

A couple of punched butterflies, ribbon and a button finished the card off nicely I think.

Thanks for stopping by today.  Have a great day.


Stamps: Pink Cat Studio Digital Gnome Family Pack, Stampin Up! Whimsy Jumbo Wheel
Ink: Stampin Up! Blush Blossom, Green Galore
Card Stock: White, Stampin Up! Blush Blossom, Gable Green, Imaginesce Designer Paper
Accessories: Prismacolor Markers, Pop Dots, Dimensionals, Ribbon, Button, Pop Up Glue Dot, MFT Cloud Die-Namics, Sponge, MS Butterfly Punch, Stampendous Class-A-Peels

Monday, March 7, 2011

Hive Dancing - MMTPT136


Hello everyone!  Happy Monday night, almost Tuesday! ;)  It's time for another Mothermark Teapot Tuesday challenge.  This week we are going to be dancing at the Roxbury!  In other words, this week's challenge is dedicated to Splitcoaststampers sketch challenge hostess Rox71.  Let's hear it for Roxie!!!! Clapping Pictures, Images and Photos   So I decided to base my card on the Bee Gee's song "Jive Talkin'" only with bumble bees.

I dusted off my Stampin Up! set Just Buzzin By and stamped my images in memento tuxedo black on white card stock and then colored with prismacolor markers.  Once all of my images were colored, I cut out one of the hives and all of the bees to pop up for added dimension.  I also pulled out a spool of ribbon I had bought over a year ago at the Michael's $1 bin figuring I would use it someday - well today is the day!!  Personally, I think that ribbon adds just a little extra touch the card needed and to help separate the beginning dancers from the pros. ja Pictures, Images and Photos

Thanks for stopping by today.  Have a great day!


Stamps: Stampin Up! Just Buzzin By
Ink: Stamping Up! Soft Sky, Memento Tuxedo Black
Card Stock: White, Summer Sun, Soft Sky, Designer Paper Scrap
Accessories: Prismacolor Markers, Pop Dots, Brads, Ribbon, Stipple Brush

Tuesday, March 1, 2011

Musical Challenge 17 - LeAnn Rimes


This week's musical challenge was to a song by LeAnn Rimes called "A Good Friend and A Glass of Wine".  Well since I don't drink, normally that should be hard for me to come up with something.  However, I had a bella image from an image swap a couple of years back and she worked just fine paired with some old Provo Craft designer paper, wine glass charm (Michael's $1 spot) and paper flowers.

I colored the bella image with Rose Art colored pencils and then over stamped a crackled background from Rubber Stampede in Tim Holtz tea stain ink to "dirty" it up a bit and match the designer paper.  After die cutting two scallop border strips, adding the paper flowers and wine charm, my card was done.  Easy peasy!!

Thanks for stopping by today.  Come on over to Splitcoaststampers.com and check out the musical challenges every Saturday.  They're a lot of fun!


Stamps: Stamping Bella Cosmobella, Rubber Stampede Crackle Background
Ink: Tim Holtz Tea Stain, Stampin Up! Close To Cocoa, Elegant Eggplant
Card Stock: White, Stampin Up! Always Artichoke, Chocolate Chip, Elegant Eggplant, Provo Craft Designer Paper
Accessories: Rose Art Colored Pencils, Brads, Stipple Brush, Paper Flowers, Wine Glass Charm, Pop Dots, MFT Die-namic