Hello! Welcome to Mark's Finest Papers a Heinrich Company's November Blog Hop!
This month's New Stamp Set Releases are
Peaceful Nuthatch
A Trip to Lancaster
What a Fox
Please hop along with us! You have a chance to win one of the above stamp sets! Just comment on the following blogs (don't forget this one), each day! We will announce all three winners on Thanksgiving Day. You can go back and comment if you missed a day. The winners will be chosen at 11PM EST on Wednesday November 23, 2011.
Have you ever wanted to visit the Amish countryside in Pennsylvania? Well now you can without even leaving your stamping room!! This month
Mark's Finest Papers, a Heinrich Company is releasing the set
A Trip To Lancaster. It's all about the Amish including the traditional horse & buggy, barn, the traditional Pennsylvania Dutch
barn hex sign (a Dutch barn decoration), pasture, and (6) six sayings.
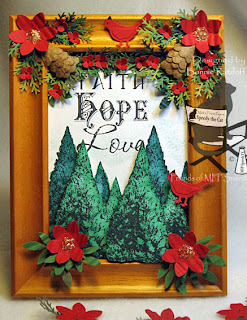
For my project, I wanted to do a framed picture and try to make it look like I was looking out the window of a house or barn. Since I've made Kittie's floral sprays more than once, I was pretty sure I could achieve this look. Now doesn't that rose pine cone look great in the photo with the frame?? Gotta love a tree that produces those on it's own.

Taking a frame I had picked up at Walmart on clearance last year, I took the glass out and put some My Minds Eye Home designer paper into the open space. Then taking the glass, I placed it behind the designer paper and then re-added the backing to seal up the frame. Taking my
A Trip To Lancaster images, I stamped them in memento tuxedo black ink onto Mark's Finest Papers
corn husk card stock then colored using koh-i-noor pencils and a blender marker. Once my coloring was done, I took a stipple brush and lightly stippled Stampin Up! bashful blue ink around the top for the sky and then wasabi ink on the bottom to help highlight the grassy area before layering onto Stampin Up! wild wasabi, and Mark's Finest Papers
black linen and
bang up blue linen card stocks.
Once everything was layered and stippled, I die cut some branch leaves to place on the "bottom" of the frame before adhering my layered images using pop up glue dots. Following
Kittie's floral spray tutorial, I finished die cutting and punching out the remaining elements I would need before running the leaves through my paper crimper. Taking some
mini orange roses I made two small sprays to place on the wooden frame corners and then twisted a couple of wire "stalks" to add as embellishments to the sprays. Once my rose sprays were finished drying, I added them to the corners of the frame by using pop up glue dots and then began assembling the rest of my floral spray using Ranger Crystal Accents as glue. For my finishing touches, I added some platinum ice stickles to the centers of the smaller flowers, gold ice stickles to the roses, and lightly stippled Ranger Adirondack
caramel ink on some of the open spaces of the frame to "distress" it a bit more.

Here's a close up of the finished frame.
I am really pleased with how it turned out especially since I assembled it while on meds for another whopper of a migraine thanks to the weather changes we had this weekend around here.
Thanks for stopping by today. Have a great day. Please make sure to visit all of the Senior Design Team blogs and leave them some love for the eye candy they're producing this week.
Stamps: MFP A Trip To Lancaster
Ink: Memento Tuxedo Black, Adirondack Caramel, Stampin Up! Bashful Blue, Wild Wasabi
Card Stock: MFP Corn Husk, Black Linen, Bang Up Blue, Stampin Up! Wild Wasabi, Scraps, My Minds Eye Home Designer Paper
Accessories: Koh-I-Noor Pencils, Prismacolor Blender Marker, Stipple Brush, Frame, Ranger Crystal Accents, Martha Stewart Pine/3-Hydrangea/Foliage Punches, Big Shot, Sizzix Branch Leaves, Pop Up Glue Dots, Black Marker, Brads, Mouse Pad, Making Memories Tool Kit, Platinum Ice Stickles, Gold Ice Stickles, Paper Crimper, Quilling Tool,
 Since the New Year is right around the corner, for my card I chose to go with a "time" theme and used My Time Made Easy's On Display's clock image paired with the Candy Shoppe Pretty Impressions digital paper. I kept my card very simple and colored my clock with only Rose Art colored pencils, added a pre-made ribbon bow, and some silk flowers from Michael's with Prima plastic floral centers.


